$2499 beast from Apple vs. $1300 PC with dedicated GPU - Find out which is better for TensorFlow
M1 Pro MacBook Pro 16" is probably the best laptop you can buy right now. It packs some serious powerhouse below the ultra-premium surface - all that while getting you through a day of heavy use on a single charge.
But what about data science? Can it come close to a PC with a dedicated GPU? That’s what we’ll answer today.
In today’s article, we’ll only compare data science use cases and ignore other laptop vs. PC differences. On the test we have a “base model” MacBook Pro M1 Pro 16" and a custom PC powered by AMD Ryzen 5 and Nvidia RTX graphics card. Here are the specs:
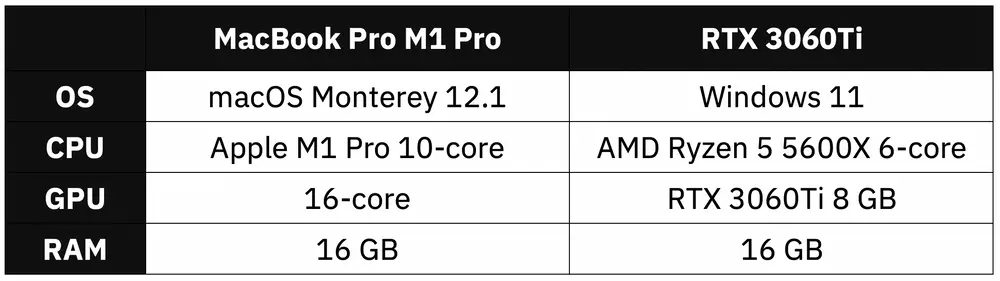
Image 1 - Hardware specification comparison (image by author)
M1 Pro 16" starts at $2499, which is steep. I’ve spent around $1300 on the custom PC. It’s almost 50% cheaper and has a dedicated GPU. It sounds better on paper, but we’ll have to do the tests to tell for sure.
Don’t feel like reading? Watch my video instead:
MacBook Pro M1 Pro vs. Custom PC - Geekbench
Synthetical benchmarks can only get us so far, but they’re a good place to start. Let’s first see how Apple Pro M1 Pro compares to AMD Ryzen 5 5600X in a single-core department:
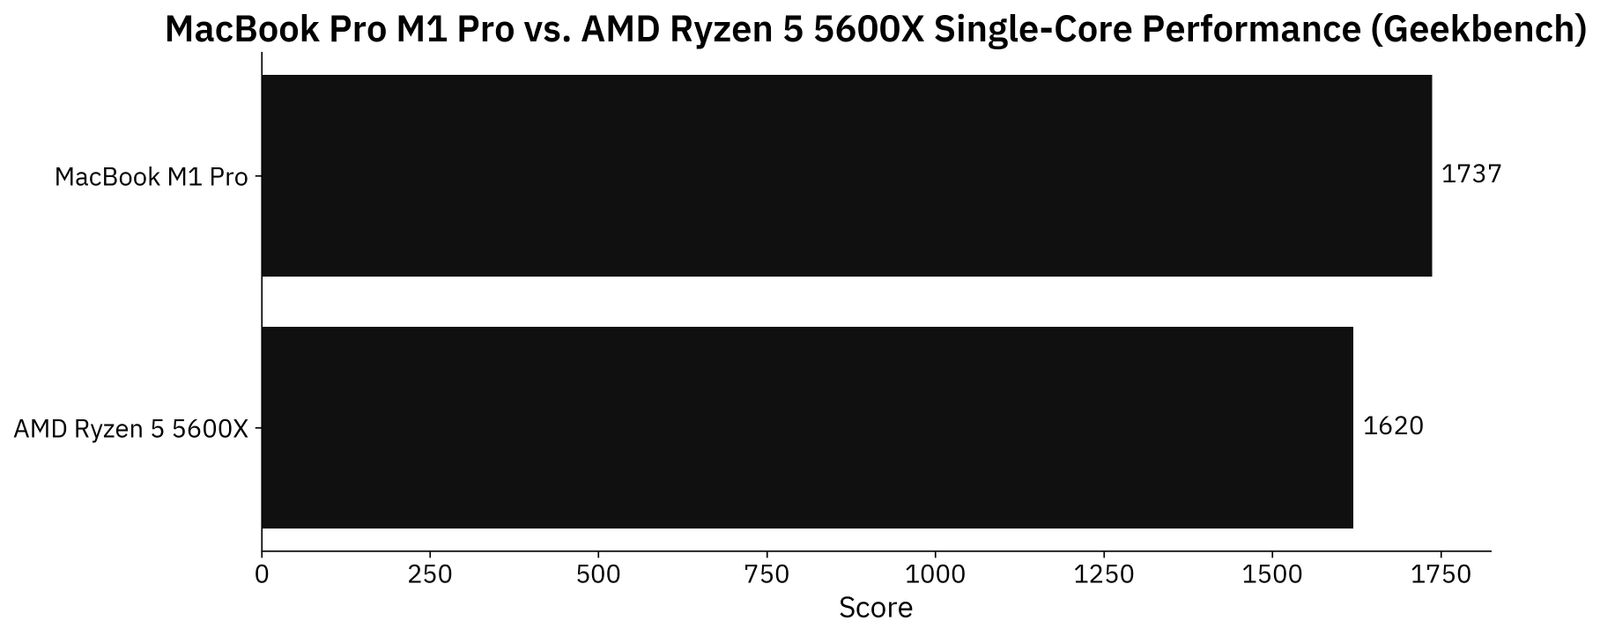
Image 2 - Geekbench single-core performance (image by author)
M1 Pro is around 7% faster, which is amazing if you consider size, power, and thermal differences between the two.
Let’s compare the multi-core performance next. M1 Pro has 10 CPU cores (8 performance and 2 efficiency), while Ryzen has 6 cores and 12 threads:
Image 3 - Geekbench multi-core performance test (image by author)
M1 Pro is significantly faster - by 62%. That’s a difference you’ll definitely notice in everyday tasks, especially if you take into account that macOS is much more optimized than Windows.
Here’s where they drift apart. Custom PC has a dedicated RTX3060Ti GPU with 8 GB of memory. M1 Pro has 16 GPU cores, but it’s not nearly as powerful:
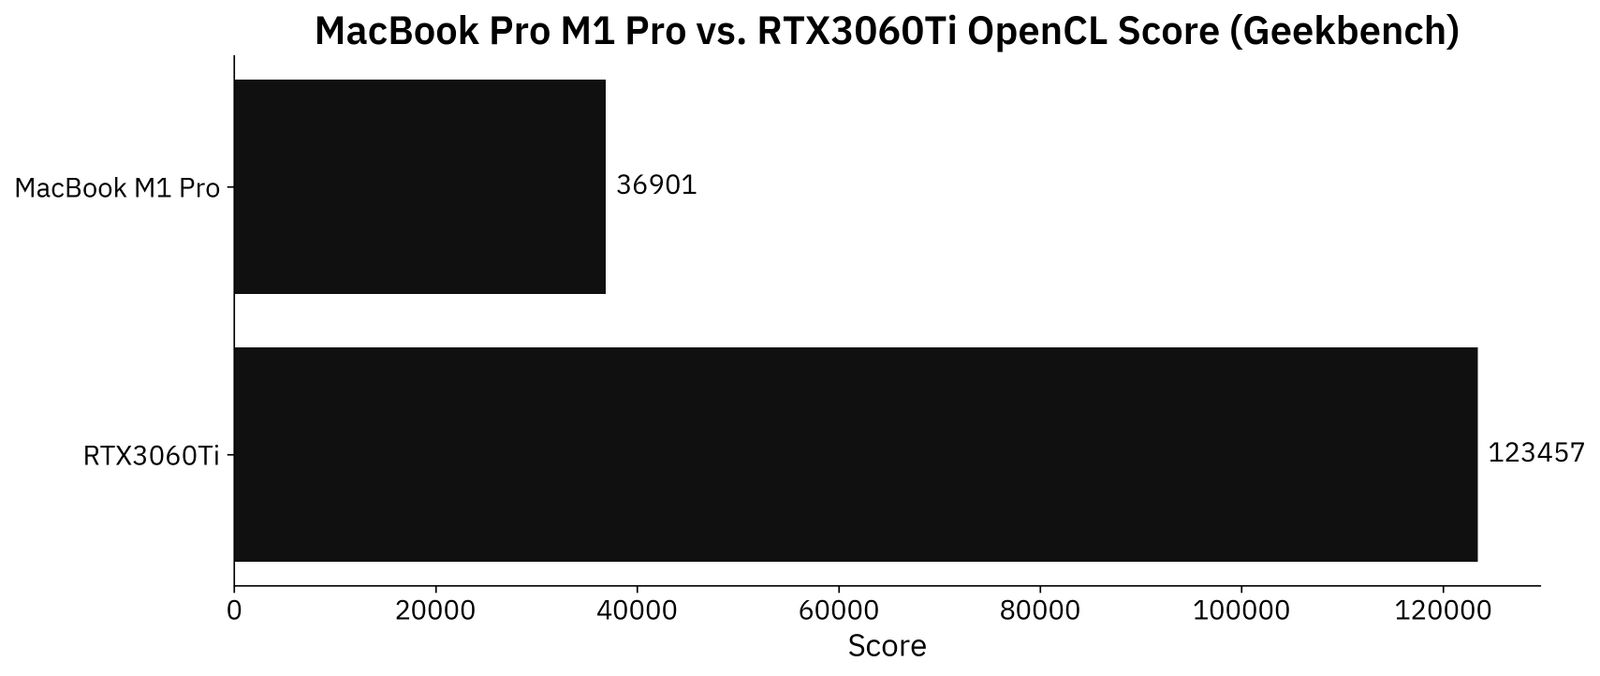
Image 4 - Geekbench OpenCL performance (image by author)
RTX3060Ti is around 3.3X faster than M1 Pro GPU according to the OpenGL benchmark. The results are expected, but they don’t necessarily translate into real-world TensorFlow usage.
Before I can show you the results, we’ll have to set up the data science benchmark.
MacBook Pro M1 Pro vs. RTX3060Ti - Data Science Benchmark Setup
You’ll need TensorFlow installed if you’re following along. Here’s an entire article dedicated to installing TensorFlow for both Apple M1 and Windows:
Also, you’ll need an image dataset. I’ve used the Dogs vs. Cats dataset from Kaggle, which is licensed under the Creative Commons License. Long story short, you can use it for free.
Refer to the following article for detailed instructions on how to organize and preprocess it:
TensorFlow for Image Classification - Top 3 Prerequisites for Deep Learning Projects
We’ll do two tests today:
- TensorFlow with a custom model architecture - Uses two convolutional blocks described in my CNN article.
- TensorFlow with transfer learning - Uses VGG-16 pretrained network to classify images.
Let’s go over the code used in the tests.
Custom TensorFlow Model - The Code
I’ve split this test into two parts - a model with and without data augmentation. Use only a single pair of train_datagen and valid_datagen at a time:
import os
import warnings
from datetime import datetime
os.environ['TF_CPP_MIN_LOG_LEVEL'] = '2'
warnings.filterwarnings('ignore')

import numpy as np
import tensorflow as tf
tf.random.set_seed(42)

####################
# 1. Data loading
####################
# USED ON A TEST WITHOUT DATA AUGMENTATION
train_datagen = tf.keras.preprocessing.image.ImageDataGenerator(
    rescale=1/255.0
)
valid_datagen = tf.keras.preprocessing.image.ImageDataGenerator(
    rescale=1/255.0
)

# USED ON A TEST WITH DATA AUGMENTATION
train_datagen = tf.keras.preprocessing.image.ImageDataGenerator(
    rescale=1/255.0,
    rotation_range=20,
    width_shift_range=0.2,
    height_shift_range=0.2,
    shear_range=0.2,
    zoom_range=0.2,
    horizontal_flip=True,
    fill_mode='nearest'
)
valid_datagen = tf.keras.preprocessing.image.ImageDataGenerator(
    rescale=1/255.0
)

train_data = train_datagen.flow_from_directory(
    directory='data/train/',
    target_size=(224, 224),
    class_mode='categorical',
    batch_size=64,
    seed=42
)
valid_data = valid_datagen.flow_from_directory(
    directory='data/validation/',
    target_size=(224, 224),
    class_mode='categorical',
    batch_size=64,
    seed=42
)

####################
# 2. Model
####################
model = tf.keras.Sequential([
    tf.keras.layers.Conv2D(filters=32, kernel_size=(3, 3), input_shape=(224, 224, 3), activation='relu'),
    tf.keras.layers.MaxPool2D(pool_size=(2, 2), padding='same'),
    tf.keras.layers.Conv2D(filters=32, kernel_size=(3, 3), activation='relu'),
    tf.keras.layers.MaxPool2D(pool_size=(2, 2), padding='same'),
    tf.keras.layers.Flatten(),
    tf.keras.layers.Dense(128, activation='relu'),
    tf.keras.layers.Dense(2, activation='softmax')
])
model.compile(
    loss=tf.keras.losses.categorical_crossentropy,
    optimizer=tf.keras.optimizers.Adam(),
    metrics=[tf.keras.metrics.BinaryAccuracy(name='accuracy')]
)

####################
# 3. Training
####################
time_start = datetime.now()
model.fit(
    train_data,
    validation_data=valid_data,
    epochs=5
)
time_end = datetime.now()
print(f'Duration: {time_end - time_start}')
Let’s go over the transfer learning code next.
Transfer Learning TensorFlow Model - The Code
Much of the imports and data loading code is the same. Once again, use only a single pair of train_datagen and valid_datagen at a time:
import os
import warnings
from datetime import datetime
os.environ['TF_CPP_MIN_LOG_LEVEL'] = '2'
warnings.filterwarnings('ignore')

import numpy as np
import tensorflow as tf
tf.random.set_seed(42)


####################
# 1. Data loading
####################
# USED ON A TEST WITHOUT DATA AUGMENTATION
train_datagen = tf.keras.preprocessing.image.ImageDataGenerator(
    rescale=1/255.0
)
valid_datagen = tf.keras.preprocessing.image.ImageDataGenerator(
    rescale=1/255.0
)

# USED ON A TEST WITH DATA AUGMENTATION
train_datagen = tf.keras.preprocessing.image.ImageDataGenerator(
    rescale=1/255.0,
    rotation_range=20,
    width_shift_range=0.2,
    height_shift_range=0.2,
    shear_range=0.2,
    zoom_range=0.2,
    horizontal_flip=True,
    fill_mode='nearest'
)
valid_datagen = tf.keras.preprocessing.image.ImageDataGenerator(
    rescale=1/255.0
)

train_data = train_datagen.flow_from_directory(
    directory='data/train/',
    target_size=(224, 224),
    class_mode='categorical',
    batch_size=64,
    seed=42
)
valid_data = valid_datagen.flow_from_directory(
    directory='data/validation/',
    target_size=(224, 224),
    class_mode='categorical',
    batch_size=64,
    seed=42
)

####################
# 2. Base model
####################
vgg_base_model = tf.keras.applications.vgg16.VGG16(
    include_top=False,
    input_shape=(224, 224, 3),
    weights='imagenet'
)
for layer in vgg_base_model.layers:
    layer.trainable = False

####################
# 3. Custom layers
####################
x = tf.keras.layers.Flatten()(vgg_base_model.layers[-1].output)
x = tf.keras.layers.Dense(128, activation='relu')(x)
out = tf.keras.layers.Dense(2, activation='softmax')(x)

vgg_model = tf.keras.models.Model(
    inputs=vgg_base_model.inputs,
    outputs=out
)
vgg_model.compile(
    loss=tf.keras.losses.categorical_crossentropy,
    optimizer=tf.keras.optimizers.Adam(),
    metrics=[tf.keras.metrics.BinaryAccuracy(name='accuracy')]
)

####################
# 4. Training
####################
time_start = datetime.now()
vgg_model.fit(
    train_data,
    validation_data=valid_data,
    epochs=5
)
time_end = datetime.now()
print(f'Duration: {time_end - time_start}')
Finally, let’s see the results of the benchmarks.
MacBook Pro M1 Pro vs. RTX3060Ti - Data Science Benchmark Results
We’ll now compare the average training time per epoch for both M1 Pro and PC on the custom model architecture. Keep in mind that two models were trained, one with and one without data augmentation:
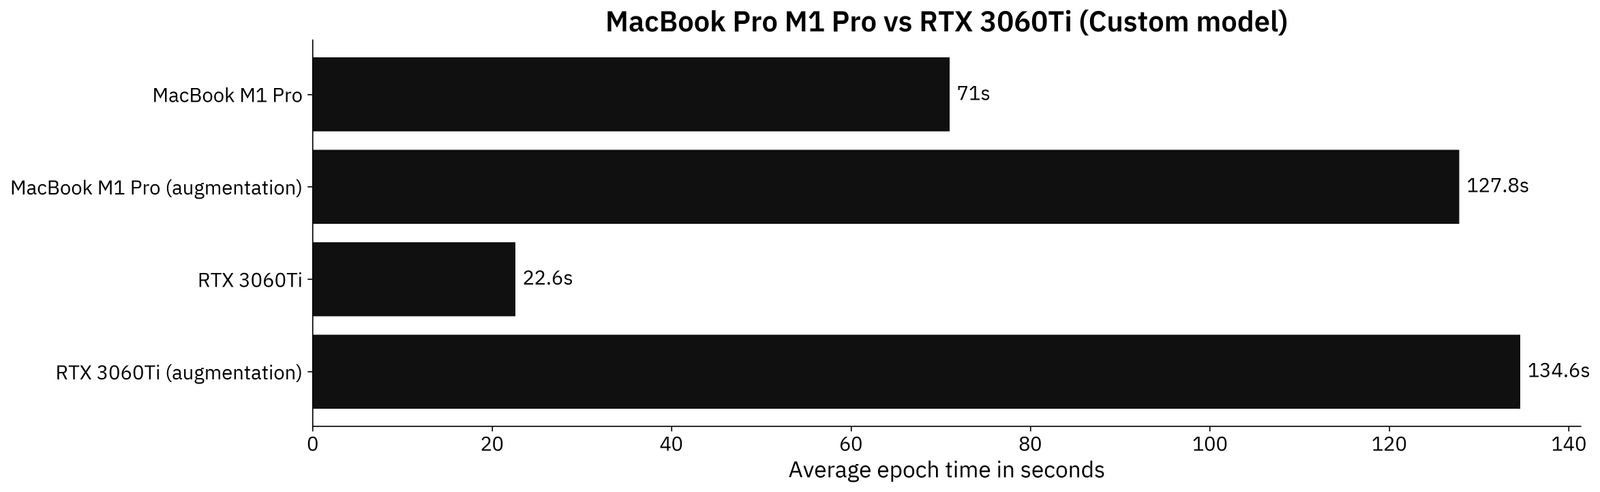
Image 5 - Custom model results in seconds (M1 Pro: 71; M1 Pro augmented: 127.8; RTX 3060Ti: 22.6; RTX3060Ti augmented: 134.6) (image by author)
RTX3060Ti is 3,14X faster than M1 Pro on the non-augmented image dataset. For some reason, augmentation takes a huge toll on the custom PC, so M1 Pro ends up running 7 seconds faster per epoch on the augmented dataset.
But who writes CNN models from scratch these days? Transfer learning is always recommended if you have limited data and your images aren’t highly specialized:
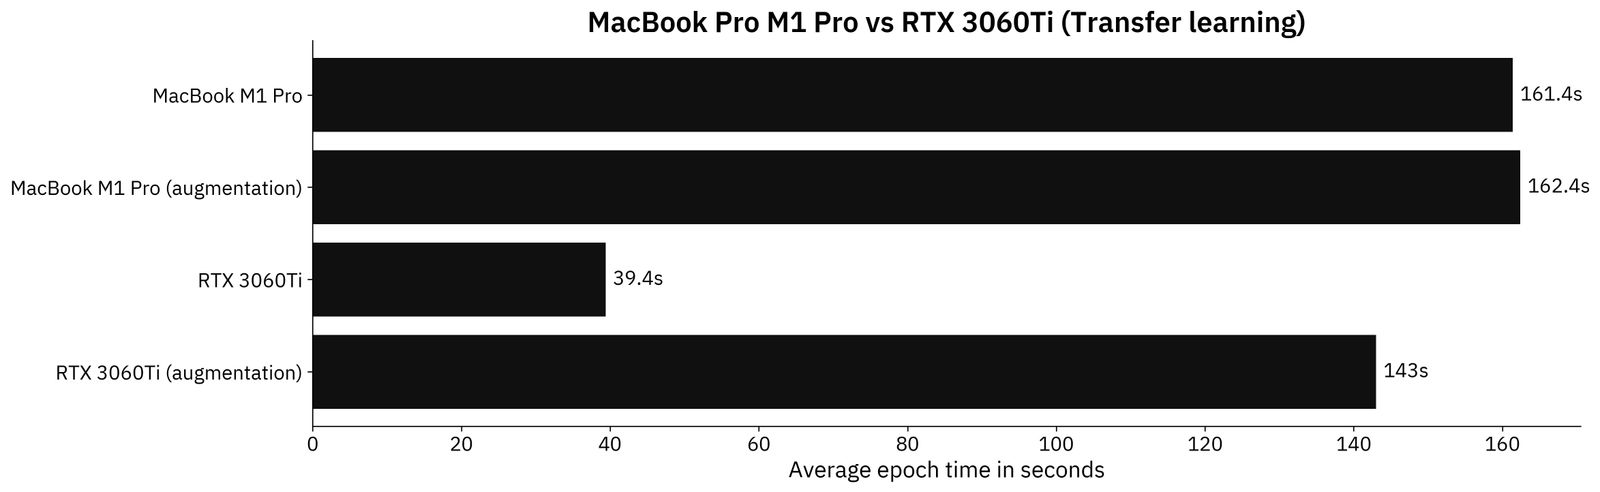
Image 6 - Transfer learning model results in seconds (M1 Pro: 161.4; M1 Pro augmented: 162.4; RTX3060Ti: 39.4; RTX306Ti augmented: 143) (image by author)
There’s no point discussing the difference between models trained on non-augmented datasets - it’s huge.
But if we take into account data augmentation, then M1 Pro is only 13% slower than RTX3060Ti. Impressive results! Keep in mind that RTX is a dedicated GPU that consumes a lot of power, while the M1 Pro is a tiny laptop chip.
We knew right from the start that M1 Pro doesn’t stand a chance, but it was a close call. Maybe the story would be different on M1 Max with 32 GPU cores, but I can’t tell.
Parting Words
You can’t really compare laptops and desktop PCs, at least not their raw performance in the same price range. Macs and PCs are fundamentally different. There’s a whole lot of reason to love macOS as a developer. For me, it feels like a flavor of Linux that’s actually finished and properly tested.
A desktop PC with RTX3060Ti offers a significantly different experience than M1 Pro MacBook Pro. Both can handle data science workflows, but the PC offers the most bang for your buck. If you need portability, you won’t even consider the PC. Both are fantastic, and it boils down to personal preference.
If you have a more powerful M1 chip, like M1 Max with 24/32 core GPU, please share the results you get on my TensorFlow test.
Learn More
- MacBook M1 vs. M1 Pro
- MacBook M1 vs. Google Colab
- MacBook M1 Pro vs. Google Colab
- MacBook M1 vs. RTX3060Ti
Stay connected
- Sign up for my newsletter
- Subscribe on YouTube
- Connect on LinkedIn