From 8 to 16 GPU cores - Here’s how much difference it makes in TensorFlow.
Apple’s M1 chip was an amazing technological breakthrough back in 2020. It hasn’t supported many tools data scientists need daily on launch. A lot has changed since then. We even have new M1 Pro and M1 Max chips tailored for professional users. Are these any good for data science? Definitely. Continue reading to find out more.
Apple sees professional users as content creators and filmmakers, not data scientists. Still, the new M1 Pro chip has two additional CPU cores, twice the GPU cores, and comes with twice the RAM. As data scientists, we should feel the difference.
Today I’m testing a base model M1 from 2020 and M1 Pro 16" from 2021 with the following specs:
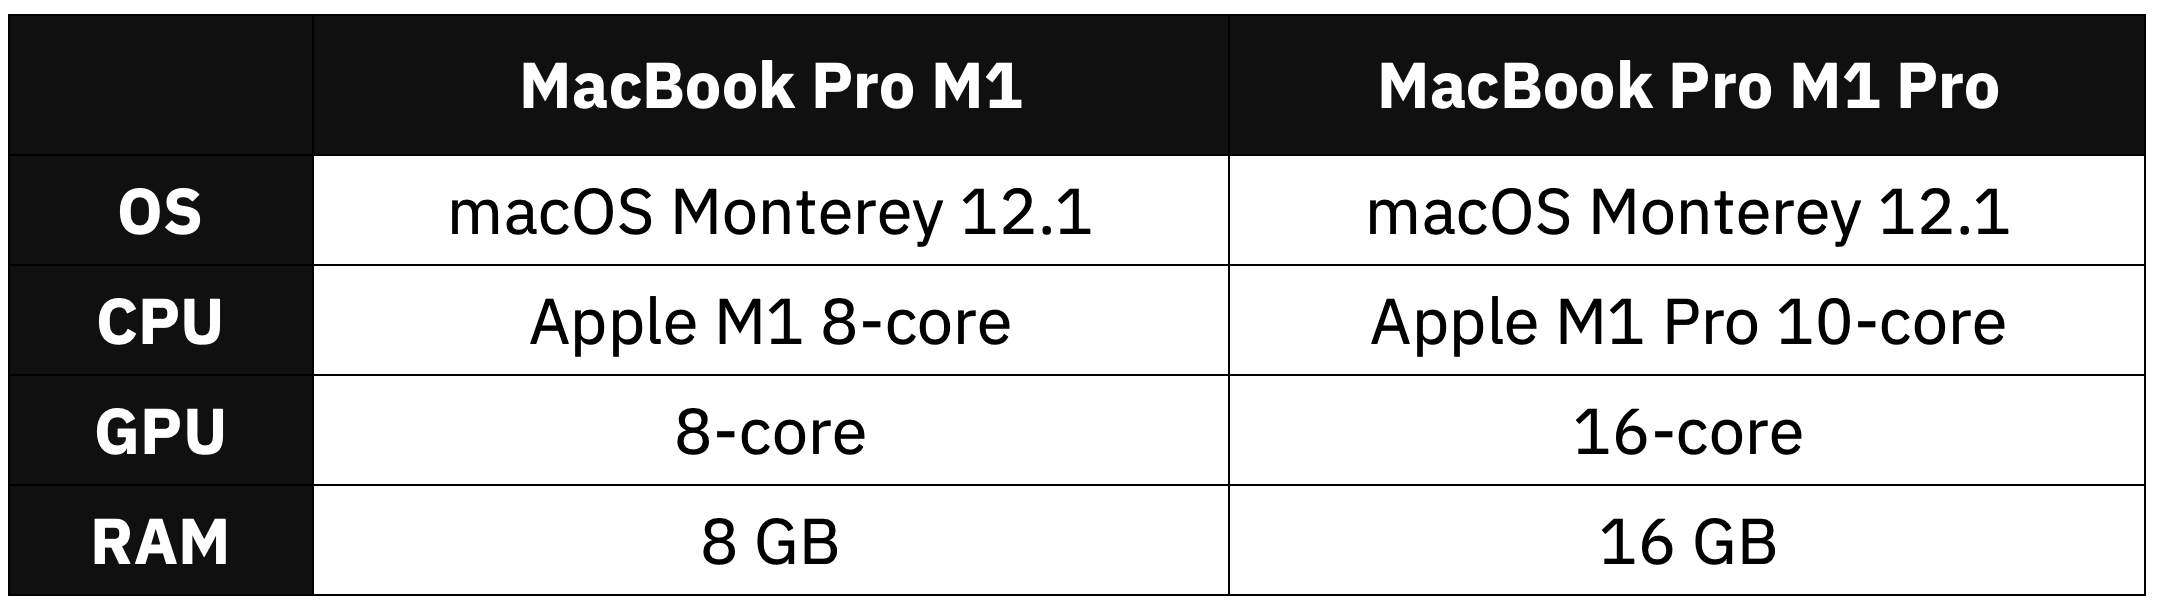
Image 1 - Hardware specification comparison (image by author)
The 2020’s M1 starts at $1299, but if you want to spec it with 16 GB RAM and 512 GB SSD, it jumps to $1699. If you can afford to spend $800 more, you’ll get 2 additional CPU and 8 additional GPU cores. Oh, and an extra 3" of screen real estate.
First, we’ll go over the synthetic benchmarks to see what we’re dealing with.
Don’t feel like reading? Watch my video instead:
M1 vs M1 Pro - Geekbench
Synthetical benchmarks don’t necessarily portray real-world usage, but they’re a good place to start. We shouldn’t see any difference in the single-core performance, as individual cores are identical. M1 Pro just has more of them arranged differently.
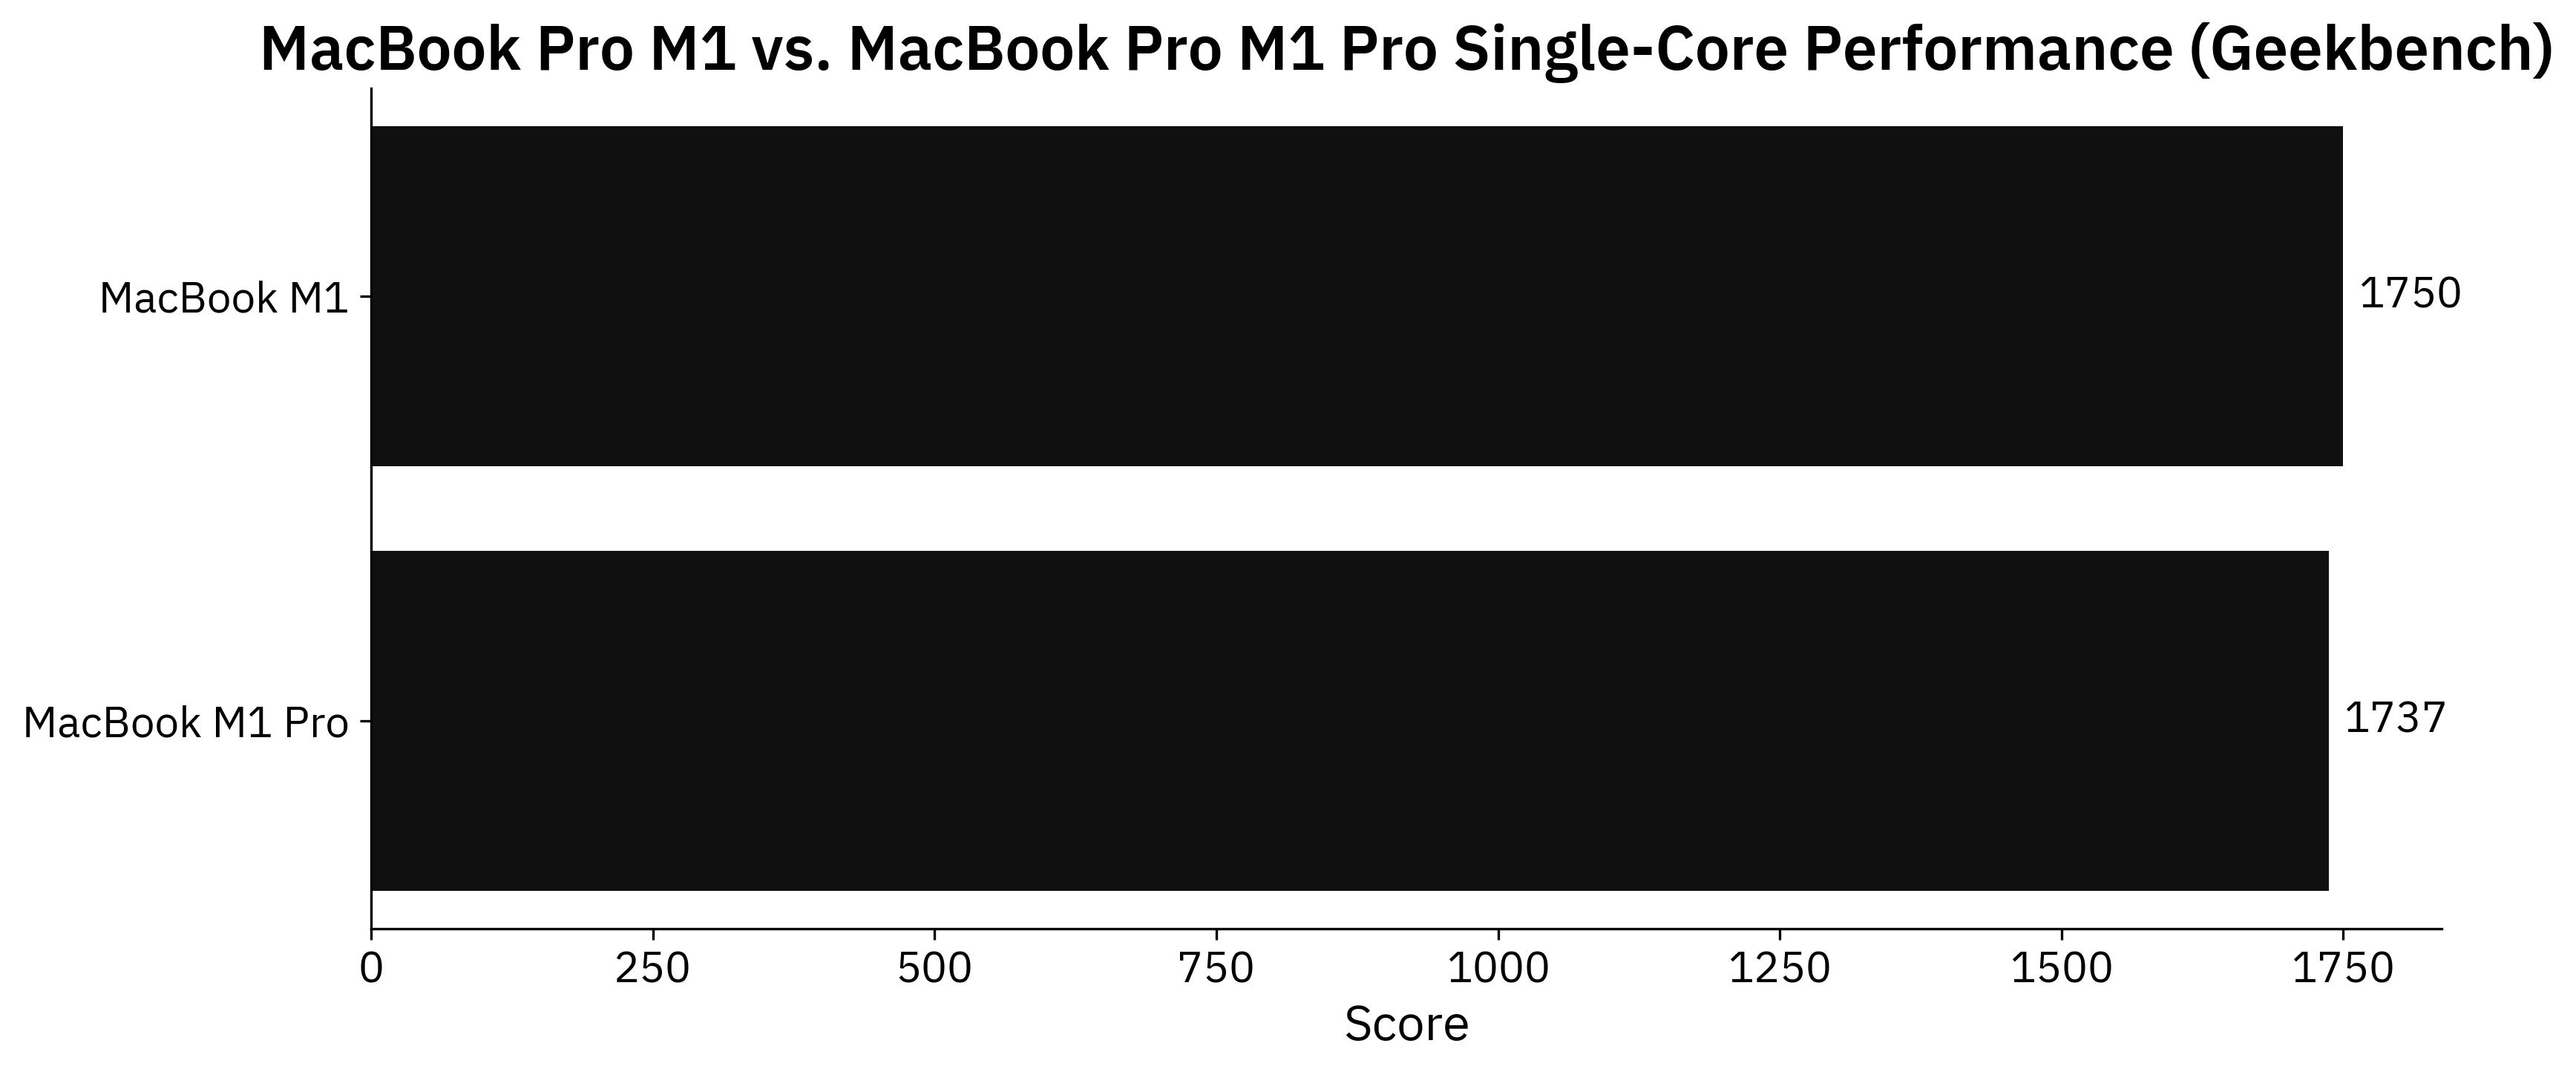
Image 2 - Geekbench single-core performance (image by author)
The regular M1 scored 13 points more, but that difference is within a margin of error. Let’s compare the multi-core performance next - the 2020’s M1 has 8 cores (4 performance and 4 efficiency), while the 2021’s M1 Pro has 10 (8 performance and 2 efficiency):
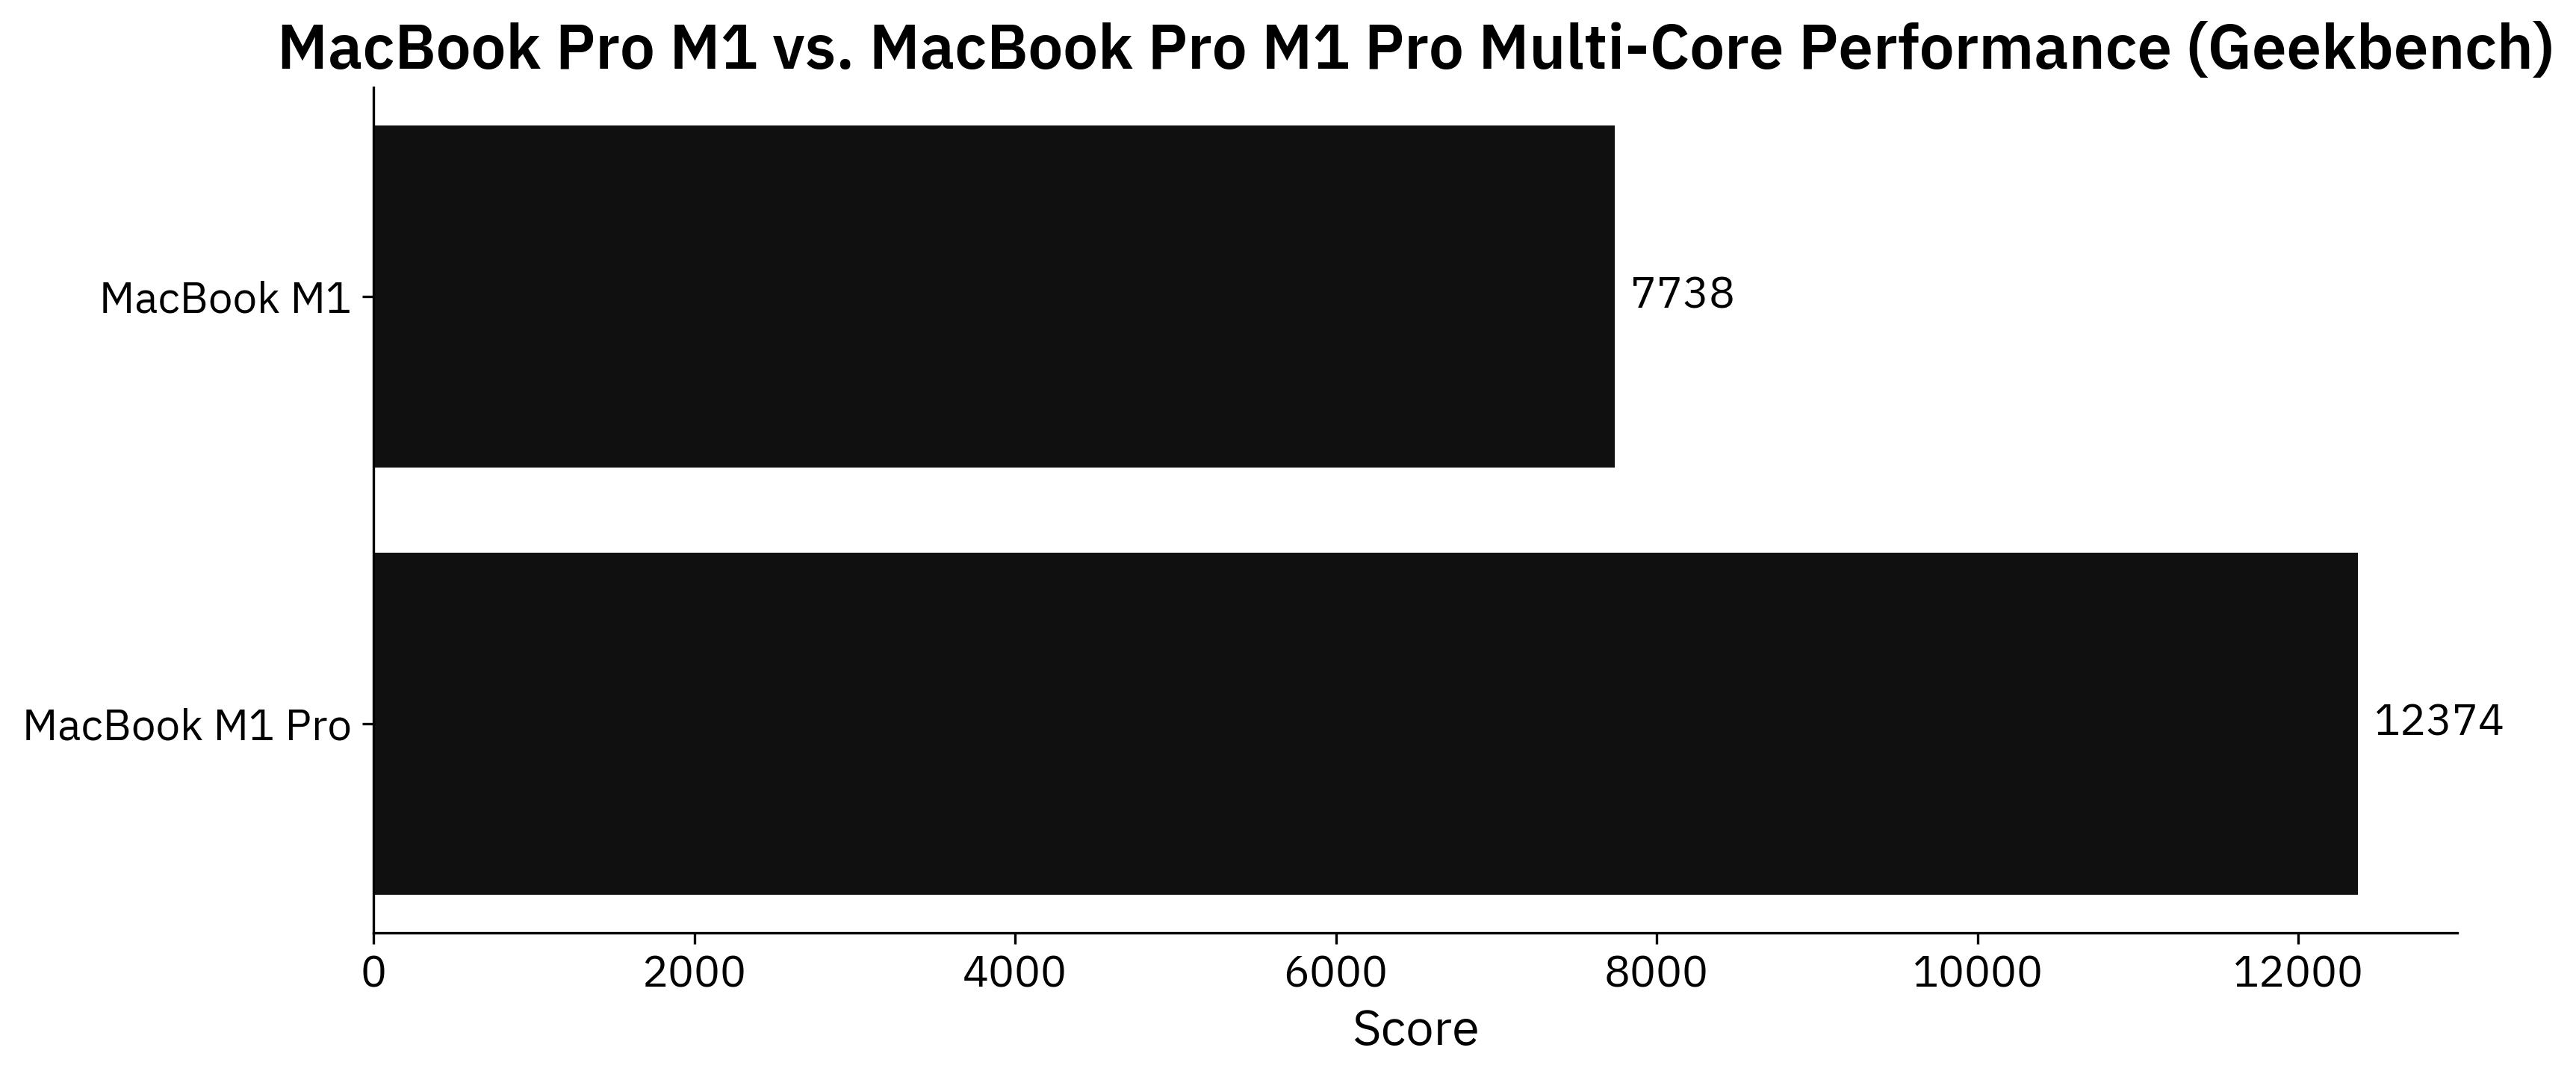
Image 3 - Geekbench multi-core performance (image by author)
M1 Pro scores around 60% higher in the multi-core test. That’s expected, as it has more cores that are better organized for demanding tasks.
Lastly, let’s compare the GPUs. You can run a Metal test with Geekbench. It’s useful because TensorFlow on macOS can use the Metal plugin to accelerate model training. The new M1 Pro has 16 GPU cores - double from the base 2020 model:
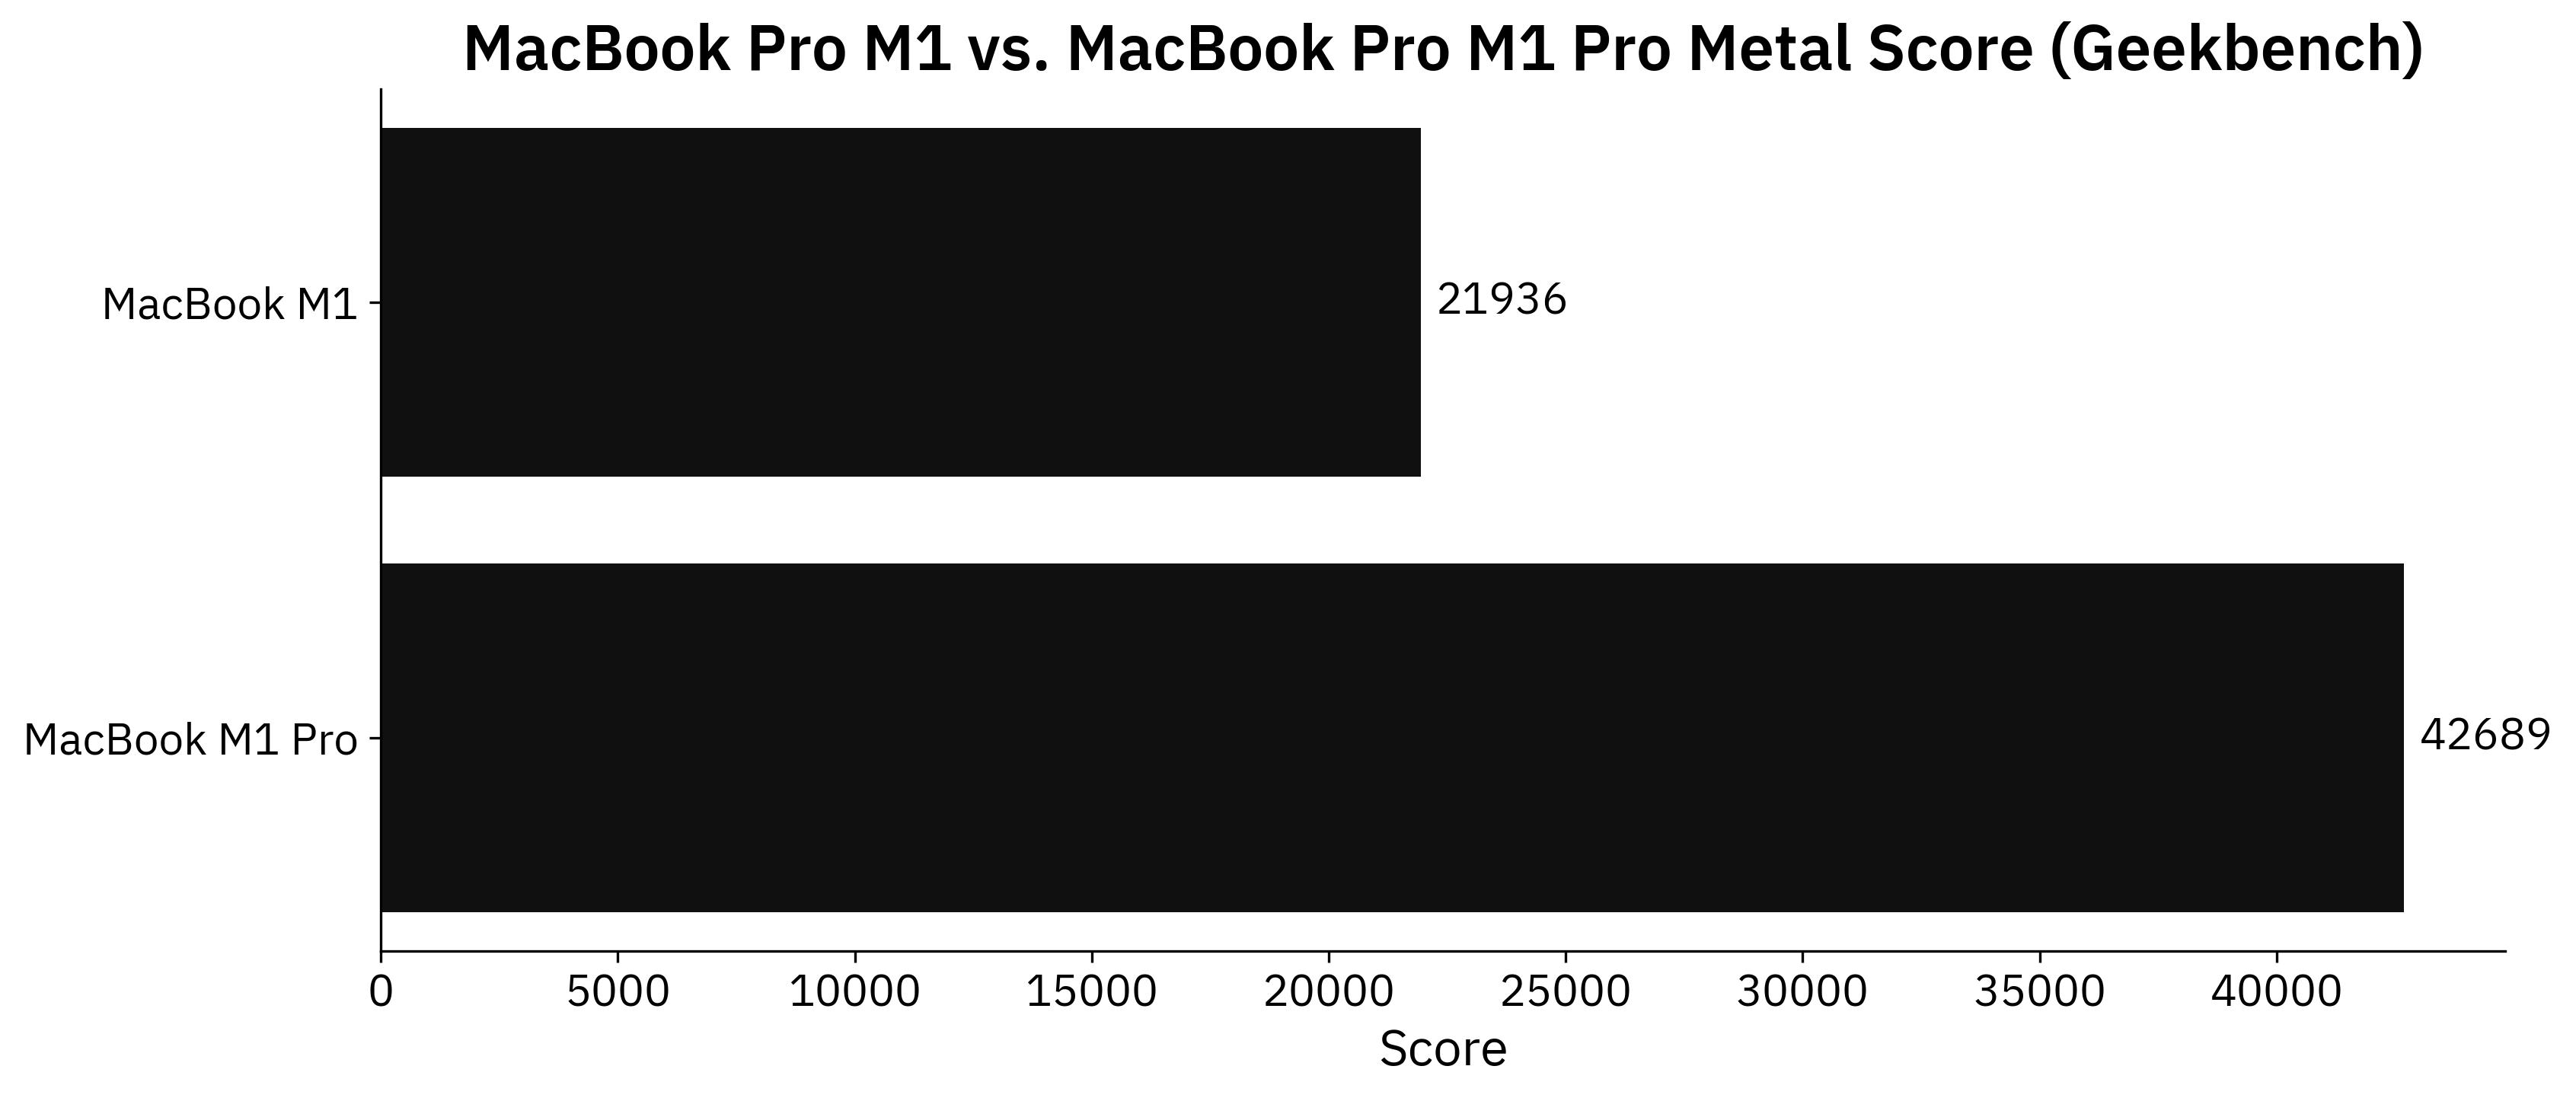
Image 4 - Geekbench Metal performance (image by author)
And it shows - the new M1 Pro is around 95% faster on the Metal test. You can spec the 2021’s model with 24 and 32 GPU cores if your wallet allows it. Let me know what’s Metal score you can get if you’ve opted for these versions.
Overall, things look promising for the M1 Pro chip. Let’s conduct a couple of real-world tests to see if the performance increases shown on the benchmark translate to data science.
M1 vs. M1 Pro - Data Science Benchmark Setup
You’ll need TensorFlow installed if you’re following along. Here’s an entire article dedicated to installing TensorFlow on Apple M1:
How To Install TensorFlow 2.7 on MacBook Pro M1 Pro With Ease
Also, you’ll need an image dataset. I’ve used the Dogs vs. Cats dataset from Kaggle, which is licensed under the Creative Commons License. Long story short, you can use it for free.
Refer to the following article for detailed instructions on how to organize and preprocess it:
TensorFlow for Image Classification - Top 3 Prerequisites for Deep Learning Projects
We’ll do two tests today:
- TensorFlow with a custom model architecture - Uses two convolutional blocks described in my CNN article.
- TensorFlow with transfer learning - Uses VGG-16 pretrained network to classify images.
Let’s go over the code used in the tests.
Custom TensorFlow Model - The Code
I’ve split this test into two parts - a model with and without data augmentation. Use only a single pair of train_datagen and valid_datagen at a time:
import os
import warnings
from datetime import datetime
os.environ['TF_CPP_MIN_LOG_LEVEL'] = '2'
warnings.filterwarnings('ignore')

import numpy as np
import tensorflow as tf
tf.random.set_seed(42)

####################
# 1. Data loading
####################
# USED ON A TEST WITHOUT DATA AUGMENTATION
train_datagen = tf.keras.preprocessing.image.ImageDataGenerator(
    rescale=1/255.0
)
valid_datagen = tf.keras.preprocessing.image.ImageDataGenerator(
    rescale=1/255.0
)

# USED ON A TEST WITH DATA AUGMENTATION
train_datagen = tf.keras.preprocessing.image.ImageDataGenerator(
    rescale=1/255.0,
    rotation_range=20,
    width_shift_range=0.2,
    height_shift_range=0.2,
    shear_range=0.2,
    zoom_range=0.2,
    horizontal_flip=True,
    fill_mode='nearest'
)
valid_datagen = tf.keras.preprocessing.image.ImageDataGenerator(
    rescale=1/255.0
)

train_data = train_datagen.flow_from_directory(
    directory='data/train/',
    target_size=(224, 224),
    class_mode='categorical',
    batch_size=64,
    seed=42
)
valid_data = valid_datagen.flow_from_directory(
    directory='data/validation/',
    target_size=(224, 224),
    class_mode='categorical',
    batch_size=64,
    seed=42
)

####################
# 2. Model
####################
model = tf.keras.Sequential([
    tf.keras.layers.Conv2D(filters=32, kernel_size=(3, 3), input_shape=(224, 224, 3), activation='relu'),
    tf.keras.layers.MaxPool2D(pool_size=(2, 2), padding='same'),
    tf.keras.layers.Conv2D(filters=32, kernel_size=(3, 3), activation='relu'),
    tf.keras.layers.MaxPool2D(pool_size=(2, 2), padding='same'),
    tf.keras.layers.Flatten(),
    tf.keras.layers.Dense(128, activation='relu'),
    tf.keras.layers.Dense(2, activation='softmax')
])
model.compile(
    loss=tf.keras.losses.categorical_crossentropy,
    optimizer=tf.keras.optimizers.Adam(),
    metrics=[tf.keras.metrics.BinaryAccuracy(name='accuracy')]
)

####################
# 3. Training
####################
time_start = datetime.now()
model.fit(
    train_data,
    validation_data=valid_data,
    epochs=5
)
time_end = datetime.now()
print(f'Duration: {time_end - time_start}')
Let’s go over the transfer learning code next.
Transfer Learning TensorFlow Model - The Code
Much of the imports and data loading code is the same. Once again, use only a single pair of train_datagen and valid_datagen at a time:
import os
import warnings
from datetime import datetime
os.environ['TF_CPP_MIN_LOG_LEVEL'] = '2'
warnings.filterwarnings('ignore')

import numpy as np
import tensorflow as tf
tf.random.set_seed(42)

####################
# 1. Data loading
####################
# USED ON A TEST WITHOUT DATA AUGMENTATION
train_datagen = tf.keras.preprocessing.image.ImageDataGenerator(
    rescale=1/255.0
)
valid_datagen = tf.keras.preprocessing.image.ImageDataGenerator(
    rescale=1/255.0
)

# USED ON A TEST WITH DATA AUGMENTATION
train_datagen = tf.keras.preprocessing.image.ImageDataGenerator(
    rescale=1/255.0,
    rotation_range=20,
    width_shift_range=0.2,
    height_shift_range=0.2,
    shear_range=0.2,
    zoom_range=0.2,
    horizontal_flip=True,
    fill_mode='nearest'
)
valid_datagen = tf.keras.preprocessing.image.ImageDataGenerator(
    rescale=1/255.0
)

train_data = train_datagen.flow_from_directory(
    directory='data/train/',
    target_size=(224, 224),
    class_mode='categorical',
    batch_size=64,
    seed=42
)
valid_data = valid_datagen.flow_from_directory(
    directory='data/validation/',
    target_size=(224, 224),
    class_mode='categorical',
    batch_size=64,
    seed=42
)

####################
# 2. Base model
####################
vgg_base_model = tf.keras.applications.vgg16.VGG16(
    include_top=False,
    input_shape=(224, 224, 3),
    weights='imagenet'
)
for layer in vgg_base_model.layers:
    layer.trainable = False

####################
# 3. Custom layers
####################
x = tf.keras.layers.Flatten()(vgg_base_model.layers[-1].output)
x = tf.keras.layers.Dense(128, activation='relu')(x)
out = tf.keras.layers.Dense(2, activation='softmax')(x)

vgg_model = tf.keras.models.Model(
    inputs=vgg_base_model.inputs,
    outputs=out
)
vgg_model.compile(
    loss=tf.keras.losses.categorical_crossentropy,
    optimizer=tf.keras.optimizers.Adam(),
    metrics=[tf.keras.metrics.BinaryAccuracy(name='accuracy')]
)

####################
# 4. Training
####################
time_start = datetime.now()
vgg_model.fit(
    train_data,
    validation_data=valid_data,
    epochs=5
)
time_end = datetime.now()
print(f'Duration: {time_end - time_start}')
Finally, let’s see the results of the benchmarks.
M1 vs. M1 Pro - Data Science Benchmark Results
We’ll now compare the average training time per epochs for both M1 and M1 Pro on the custom model architecture. Keep in mind that two models were trained, one with and one without data augmentation:
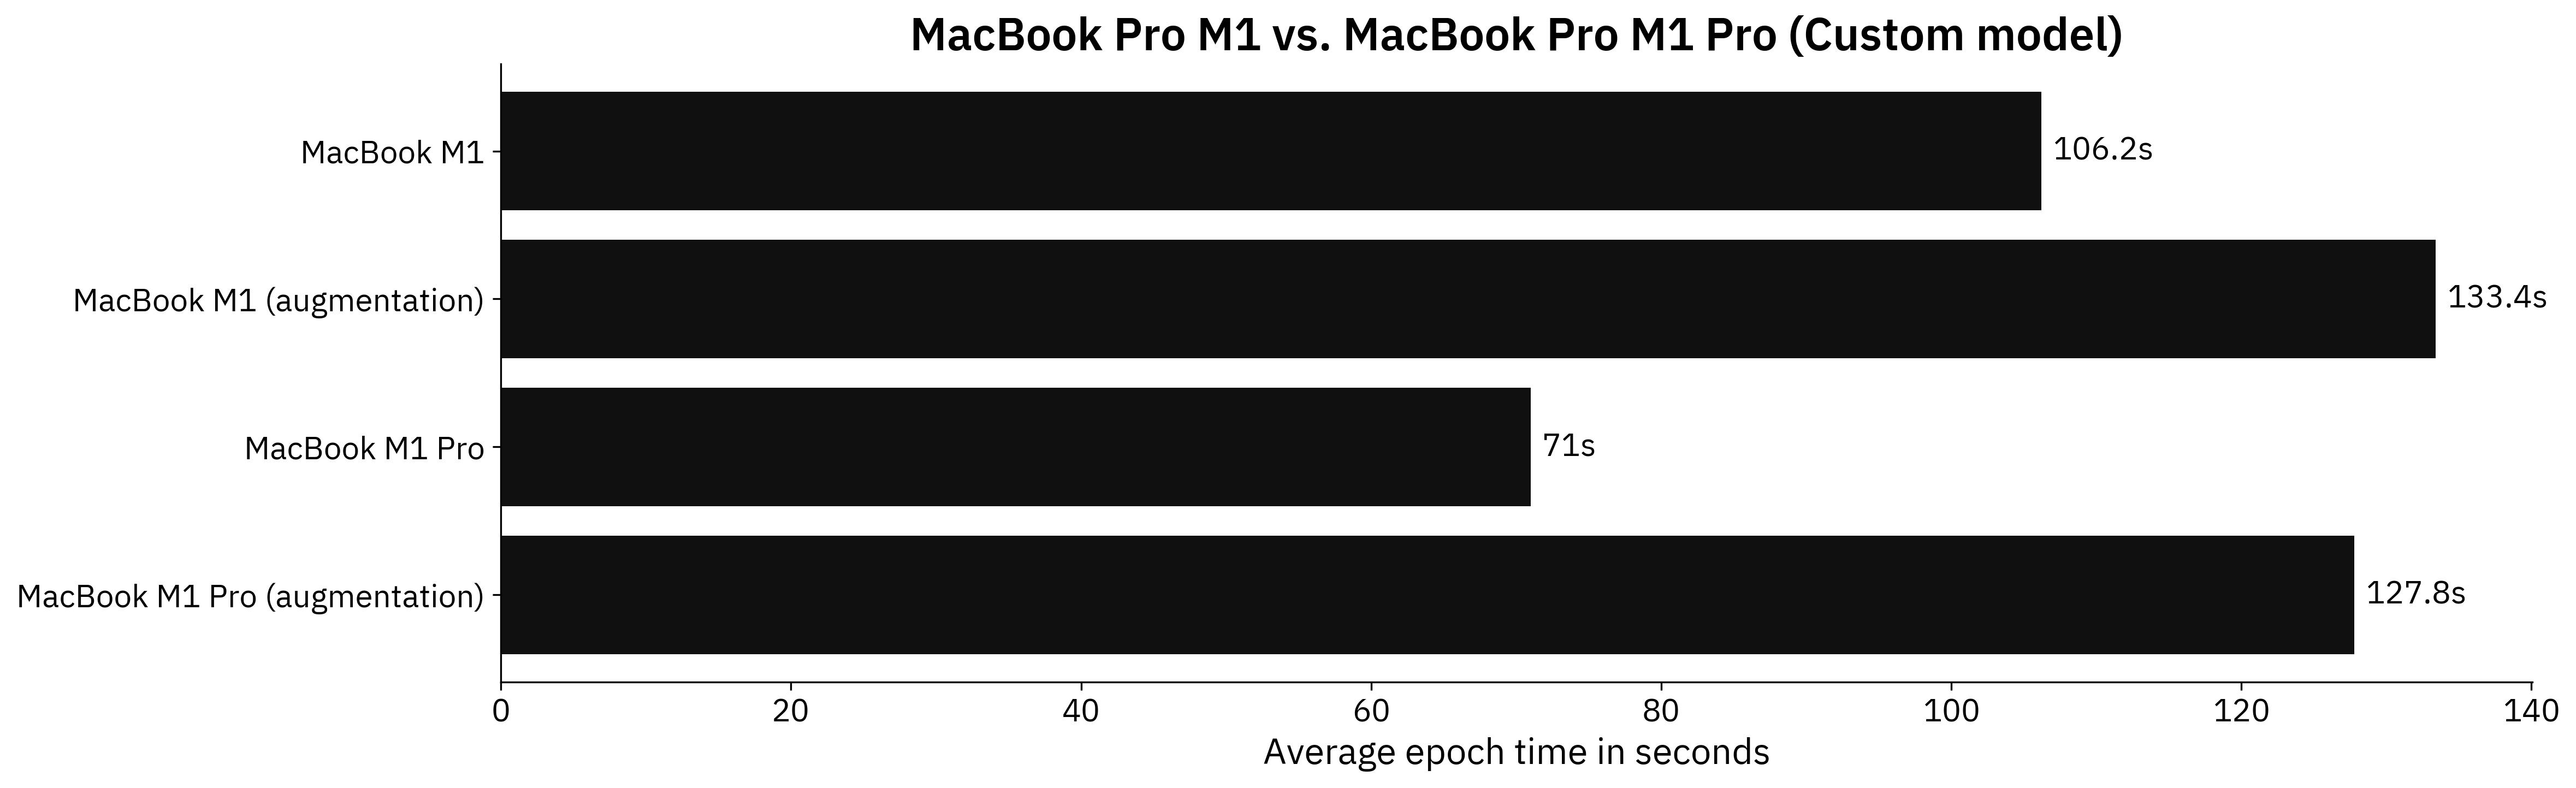
Image 5 - Benchmark results - custom model (image by author)
The M1 Pro is around 1.5X faster for the default model. Strangely, the results are almost identical for a model that used data augmentation.
But who writes CNN models from scratch these days? Transfer learning is always recommended if you have limited data and your images aren’t highly specialized. Here are the results for the transfer learning models:
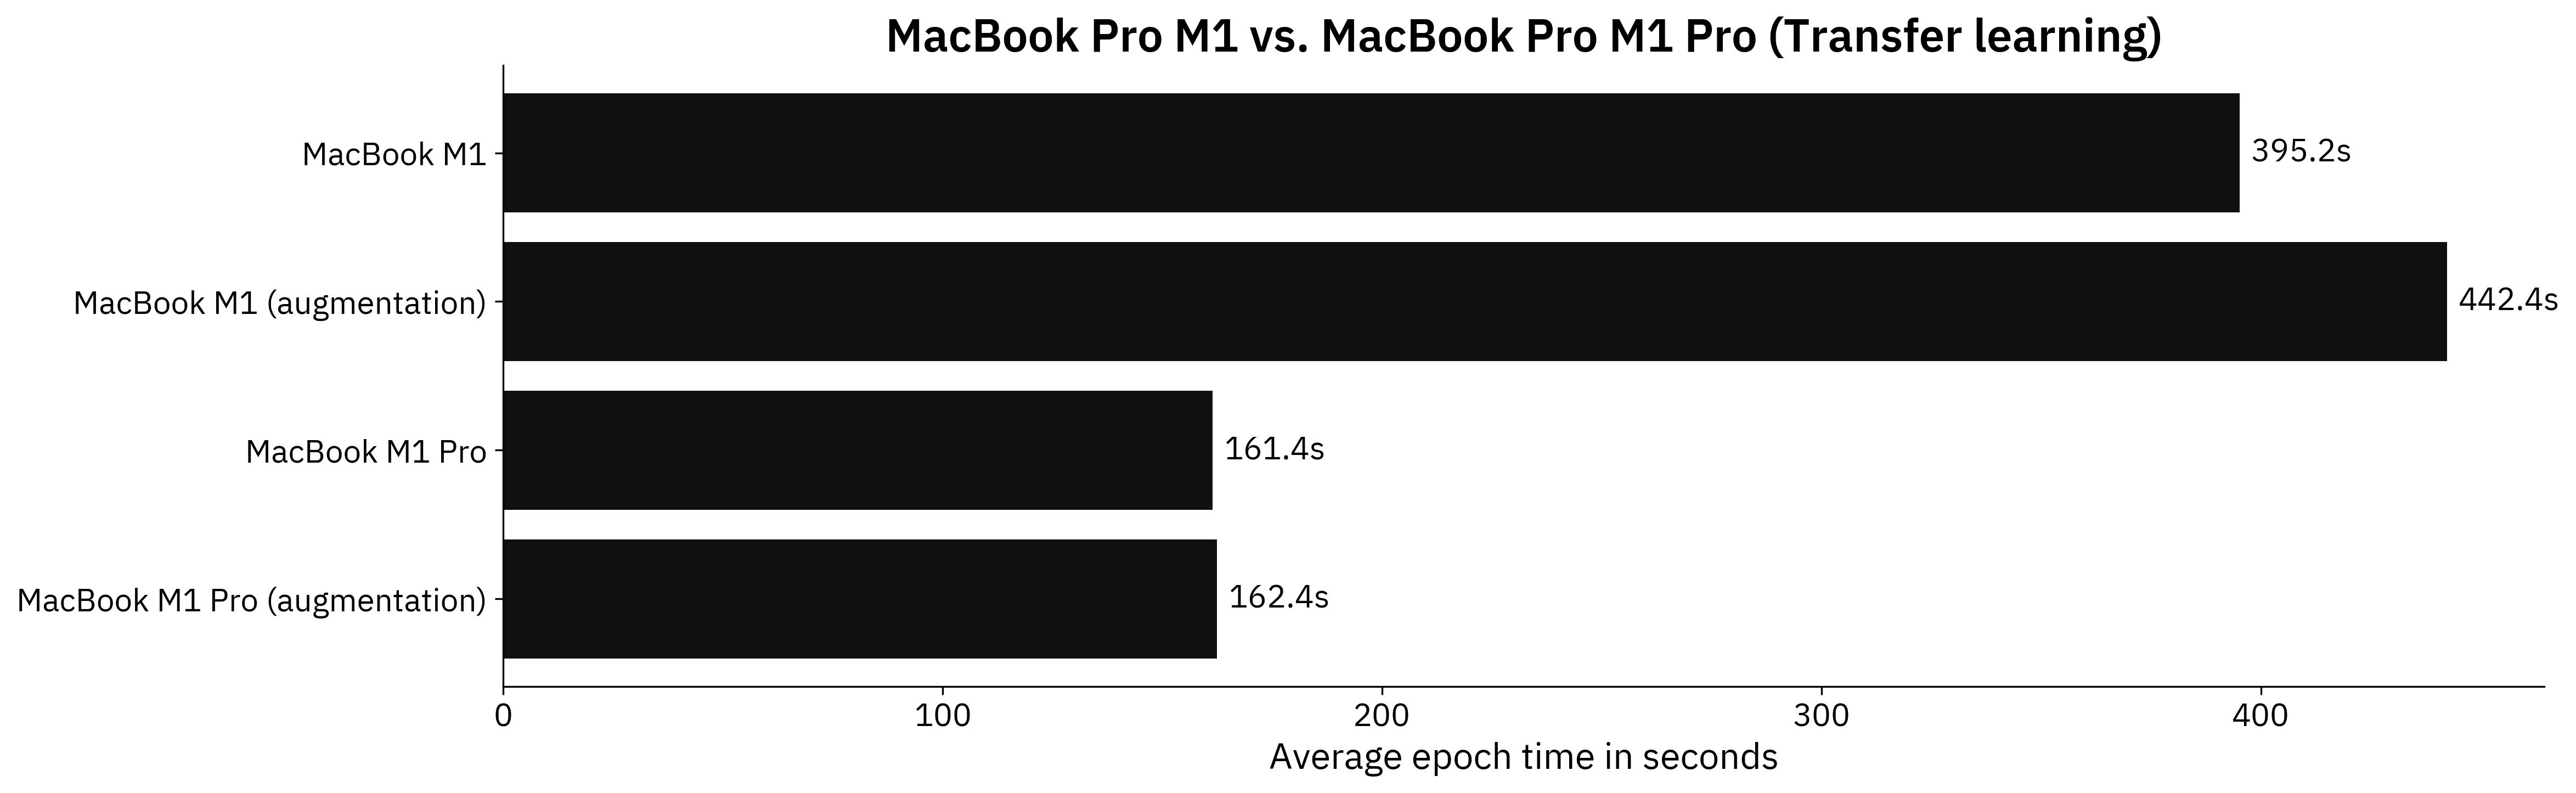
Image 6 - Benchmark results - transfer learning model (image by author)
M1 Pro demolishes the old 2020 M1 MacBook by a large margin. It was around 2.45X faster on a model without augmentation and around 2.72X faster on the model with augmentation.
I have to admit, these results are impressive to see on a MacBook, which wasn’t made with data scientists in mind. Does that mean you should buy one? Probably not.
Parting Words
One thing is certain - M1 Pro outperforms the regular M1 in all data science tests we did today. Still, it’s not the best bang for your buck if you only care about data science and machine learning. You can buy a $500 laptop and do all of the heavy lifting in the cloud. You could buy a desktop workstation with one or more dedicated GPUs. Macs don’t stand a chance in this case.
If you’re looking for a laptop that can handle typical data science workloads and doesn’t scream cheap plastic and unnecessary red details, M1 might be the best option. It’s fast, responsive, light, has a superb screen, and all-day battery life. Plus, you can definitely use it for data science. It maybe isn’t the most cost-effective option, sure, but they offer a lot of things Windows laptops just can’t match.
What are your thoughts on the new M1 Pro and Max chips for data science? Can you run my benchmarks on your machine and share the results? Let me know in the comment section below.
Stay connected
- Sign up for my newsletter
- Subscribe on YouTube
- Connect on LinkedIn