NVIDIA RTX3060Ti dedicated GPU vs. a completely free environment - Which is better for TensorFlow?
Is it worth buying a dedicated GPU for deep learning? I mean, you can do most of the lightweight tasks for free in Google Colab, so is dedicated hardware worth it when you’re starting out? That’s what we’ll answer today.
Today we’ll run two data science benchmarks using TensorFlow and compare a custom PC with Google Colab. We’ll ignore the obvious benefits of having a PC and focus only on the model training speed. The custom PC set me back around $1300, which isn’t too bad for the components packed inside.
Here’s a table summarizing hardware differences between the two:
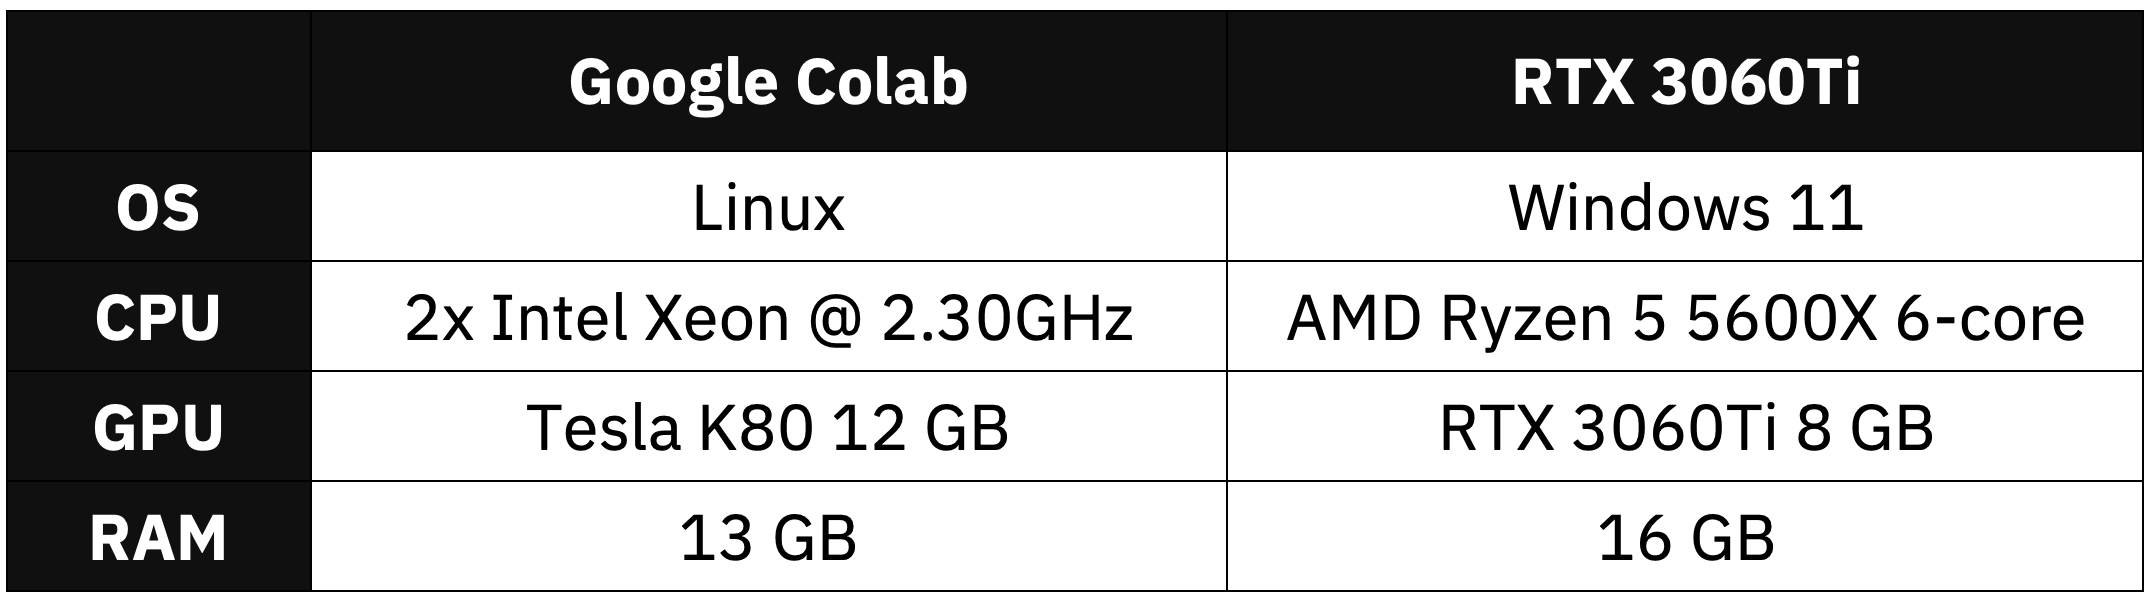
Image 1 - Hardware specification configuration
Custom PC has more RAM and a more recent CPU. Comparing GPUs is tricky. RTX is newer but packs less memory. Tesla has 4992 Cuda cores, while 3060Ti has 4864 - pretty comparable numbers. The Colab environment assigned to me is completely random. You’re likely to get a different one, so the benchmark results may vary.
Don’t feel like reading? Watch my video instead:
Google Colab vs. RTX3060Ti - Data Science Benchmark Setup
As for the dataset, I’ve used the Dogs vs. Cats dataset from Kaggle, which is licensed under the Creative Commons License. Long story short, you can use it for free.
Refer to the following article for detailed instructions on how to organize and preprocess it:
TensorFlow for Image Classification - Top 3 Prerequisites for Deep Learning Projects
We’ll do two tests today:
- TensorFlow with a custom model architecture - Uses two convolutional blocks described in my CNN article.
- TensorFlow with transfer learning - Uses VGG-16 pretrained network to classify images.
Let’s go over the code used in the tests.
Custom TensorFlow Model - The Code
I’ve split this test into two parts - a model with and without data augmentation. Use only a single pair of train_datagen and valid_datagen at a time:
import os
import warnings
from datetime import datetime
os.environ['TF_CPP_MIN_LOG_LEVEL'] = '2'
warnings.filterwarnings('ignore')

import numpy as np
import tensorflow as tf
tf.random.set_seed(42)

# COLAB ONLY
from google.colab import drive
drive.mount('/content/drive')

####################
# 1. Data loading
####################
# USED ON A TEST WITHOUT DATA AUGMENTATION
train_datagen = tf.keras.preprocessing.image.ImageDataGenerator(
    rescale=1/255.0
)
valid_datagen = tf.keras.preprocessing.image.ImageDataGenerator(
    rescale=1/255.0
)

# USED ON A TEST WITH DATA AUGMENTATION
train_datagen = tf.keras.preprocessing.image.ImageDataGenerator(
    rescale=1/255.0,
    rotation_range=20,
    width_shift_range=0.2,
    height_shift_range=0.2,
    shear_range=0.2,
    zoom_range=0.2,
    horizontal_flip=True,
    fill_mode='nearest'
)
valid_datagen = tf.keras.preprocessing.image.ImageDataGenerator(
    rescale=1/255.0
)

train_data = train_datagen.flow_from_directory(
    directory='data/train/',
    target_size=(224, 224),
    class_mode='categorical',
    batch_size=64,
    seed=42
)
valid_data = valid_datagen.flow_from_directory(
    directory='data/validation/',
    target_size=(224, 224),
    class_mode='categorical',
    batch_size=64,
    seed=42
)

####################
# 2. Model
####################
model = tf.keras.Sequential([
    tf.keras.layers.Conv2D(filters=32, kernel_size=(3, 3), input_shape=(224, 224, 3), activation='relu'),
    tf.keras.layers.MaxPool2D(pool_size=(2, 2), padding='same'),
    tf.keras.layers.Conv2D(filters=32, kernel_size=(3, 3), activation='relu'),
    tf.keras.layers.MaxPool2D(pool_size=(2, 2), padding='same'),
    tf.keras.layers.Flatten(),
    tf.keras.layers.Dense(128, activation='relu'),
    tf.keras.layers.Dense(2, activation='softmax')
])
model.compile(
    loss=tf.keras.losses.categorical_crossentropy,
    optimizer=tf.keras.optimizers.Adam(),
    metrics=[tf.keras.metrics.BinaryAccuracy(name='accuracy')]
)

####################
# 3. Training
####################
time_start = datetime.now()
model.fit(
    train_data,
    validation_data=valid_data,
    epochs=5
)
time_end = datetime.now()
print(f'Duration: {time_end - time_start}')
Let’s go over the transfer learning code next.
Transfer Learning TensorFlow Model - The Code
Much of the imports and data loading code is the same. Once again, use only a single pair of train_datagen and valid_datagen at a time:
import os
import warnings
from datetime import datetime
os.environ['TF_CPP_MIN_LOG_LEVEL'] = '2'
warnings.filterwarnings('ignore')

import numpy as np
import tensorflow as tf
tf.random.set_seed(42)

# COLAB ONLY
from google.colab import drive
drive.mount('/content/drive')

####################
# 1. Data loading
####################
# USED ON A TEST WITHOUT DATA AUGMENTATION
train_datagen = tf.keras.preprocessing.image.ImageDataGenerator(
    rescale=1/255.0
)
valid_datagen = tf.keras.preprocessing.image.ImageDataGenerator(
    rescale=1/255.0
)

# USED ON A TEST WITH DATA AUGMENTATION
train_datagen = tf.keras.preprocessing.image.ImageDataGenerator(
    rescale=1/255.0,
    rotation_range=20,
    width_shift_range=0.2,
    height_shift_range=0.2,
    shear_range=0.2,
    zoom_range=0.2,
    horizontal_flip=True,
    fill_mode='nearest'
)
valid_datagen = tf.keras.preprocessing.image.ImageDataGenerator(
    rescale=1/255.0
)

train_data = train_datagen.flow_from_directory(
    directory='data/train/',
    target_size=(224, 224),
    class_mode='categorical',
    batch_size=64,
    seed=42
)
valid_data = valid_datagen.flow_from_directory(
    directory='data/validation/',
    target_size=(224, 224),
    class_mode='categorical',
    batch_size=64,
    seed=42
)

####################
# 2. Base model
####################
vgg_base_model = tf.keras.applications.vgg16.VGG16(
    include_top=False,
    input_shape=(224, 224, 3),
    weights='imagenet'
)
for layer in vgg_base_model.layers:
    layer.trainable = False

####################
# 3. Custom layers
####################
x = tf.keras.layers.Flatten()(vgg_base_model.layers[-1].output)
x = tf.keras.layers.Dense(128, activation='relu')(x)
out = tf.keras.layers.Dense(2, activation='softmax')(x)

vgg_model = tf.keras.models.Model(
    inputs=vgg_base_model.inputs,
    outputs=out
)
vgg_model.compile(
    loss=tf.keras.losses.categorical_crossentropy,
    optimizer=tf.keras.optimizers.Adam(),
    metrics=[tf.keras.metrics.BinaryAccuracy(name='accuracy')]
)

####################
# 4. Training
####################
time_start = datetime.now()
vgg_model.fit(
    train_data,
    validation_data=valid_data,
    epochs=5
)
time_end = datetime.now()
print(f'Duration: {time_end - time_start}')
Finally, let’s see the results of the benchmarks.
Google Colab vs. RTX3060Ti - Data Science Benchmark Results
We’ll now compare the average training time per epoch for both a custom PC with RTX3060Ti and Google Colab on a custom model architecture. Keep in mind that two models were trained, one with and one without data augmentation:
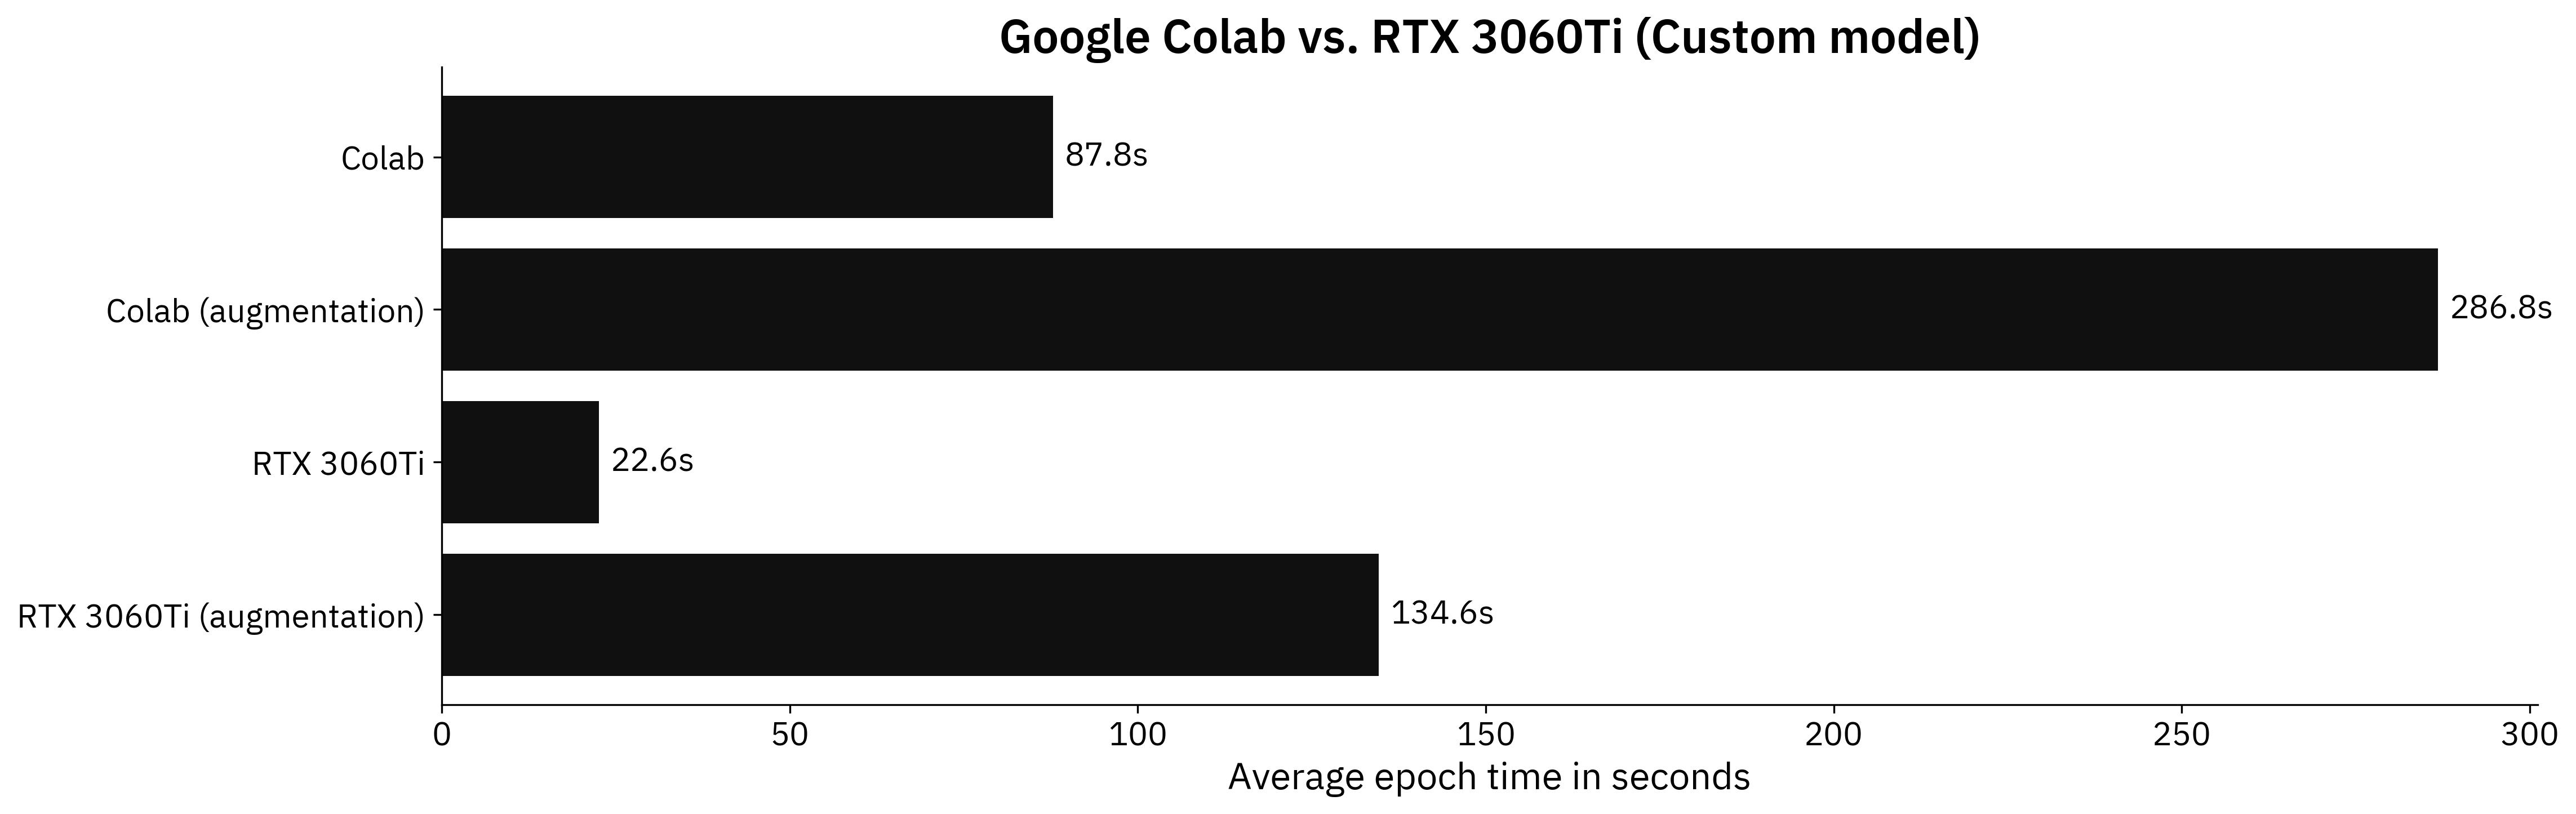
Image 2 - Benchmark results on a custom model (Colab: 87.8s; Colab (augmentation): 286.8s; RTX: 22.6s; RTX (augmentation): 134.6s) (image by author)
Not even close. RTX3060Ti dedicated GPU is almost 4 times faster on a non-augmented image dataset and around 2 times faster on the augmented set. This performance difference is expected, as you’re paying for the hardware.
But who writes CNN models from scratch these days? Transfer learning is always recommended if you have limited data and your images aren’t highly specialized. Here are the results for the transfer learning models:
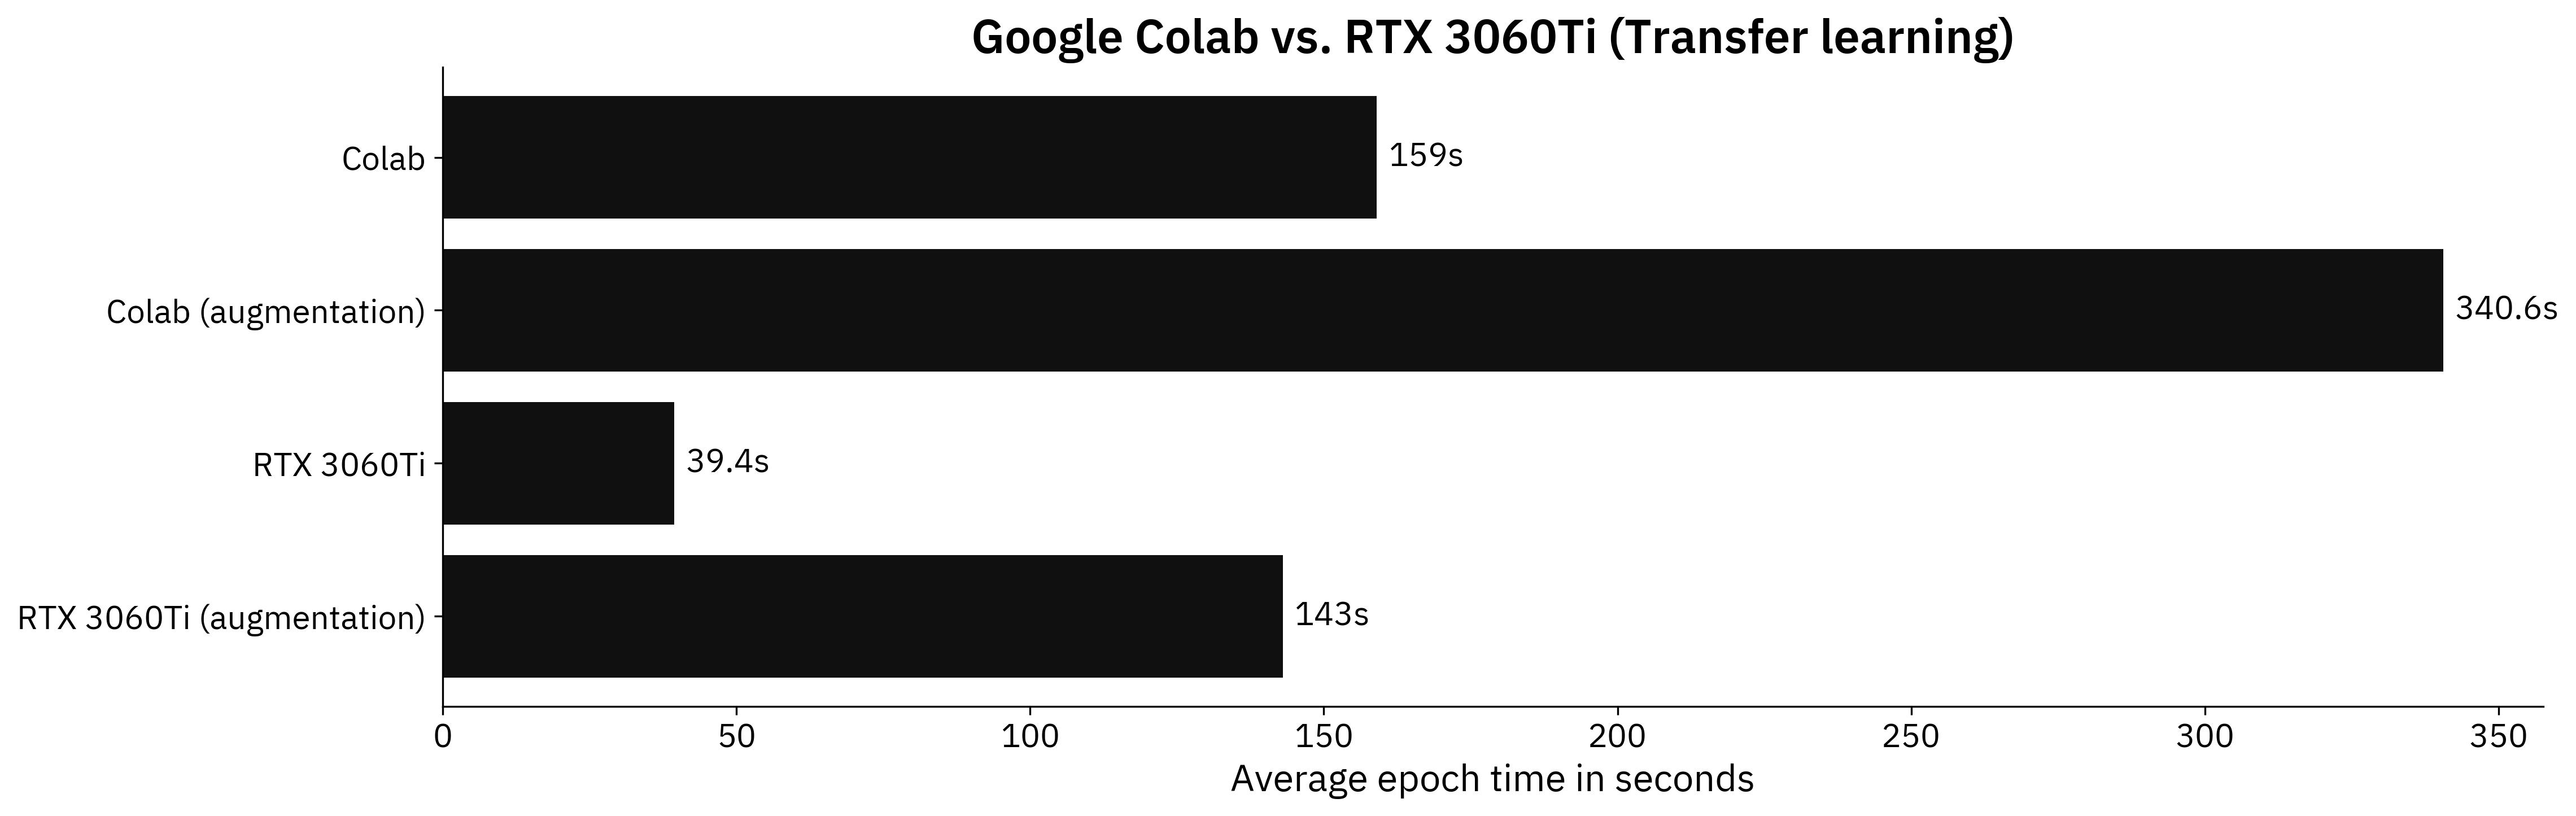
Image 3 - Benchmark results on a transfer learning model (Colab: 159s; Colab (augmentation): 340.6s; RTX: 39.4s; RTX (augmented): 143s) (image by author)
We’re looking at similar performance differences as before. RTX 3060Ti is 4 times faster than Tesla K80 running on Google Colab for a non-augmented set, and around 2.4 times faster on the augmented one.
You now know the numbers, but are these alone enough to make an informed purchase decision? It depends, and I’ll elaborate on why next.
Conclusion
If you’re working in tech, spending $1300 on a PC probably won’t be a huge hit to your wallet. That doesn’t mean it’s a valid purchase decision. A single PC isn’t scalable. What happens when RTX3060Ti isn’t enough? You have to buy an additional GPU, which is expensive and hard to come by these days.
Cloud provides a more scalable solution. You rent the GPU as you need, and scaling up/down is ridiculously easy.
That being said, a PC comes with more benefits. You can use it for other tasks, such as office work, gaming, and anything else. Cloud GPUs are only good for computing. That’s something you should think about.
To summarize, even a mid-range GPU dramatically outperforms the free Google Colab environment. Keep in mind that I was assigned with Tesla K80 12 GB, which might not be the case for you. Your benchmark results may vary.
What are your thoughts on a cloud vs. on-premise solution for deep learning? What was the tipping point in your career when the cloud became more viable? Let me know in the comment section below.
Learn More
- Benchmark: MacBook M1 13" vs. M1 Pro 16"
- Benchmark: MacBook M1 Pro 16" vs. Google Colab
- Benchmark: MacBook M1 Pro 16" vs RTX3060Ti
Stay connected
- Hire me as a technical writer
- Subscribe on YouTube
- Connect on LinkedIn