Master the concepts of the most popular programming paradigm in 10 minutes.
Object orientated programming isn’t that new of a concept. It was introduced back in the 1960s by Alan Kay, but didn’t hit the mainstream until the 1990s (thanks C++). Today we’ll look at the basics of OOP through the Python programming language.
Covering everything there is on OOP isn’t possible in a single article. Entire books are written on the topic, but we will use the 80:20 principle to cover 80% of things you’ll use daily in 20% of the time.
The article is structured as follows:
- What is OOP?
- Classes and objects
- Constructor
- Class methods
- Inheritance
- Conclusion
What is OOP?
Object orientated programming isn’t language-specific. It is a programming paradigm used in many languages, such as Python, Java, C#, and so on. OOP skills are transferable — so learning the concepts in Python makes you somewhat skilled in other languages, if we don’t take the syntactical differences into account.
OOP is all about creating objects from classes. A single class contains numerous fields and methods that are somehow related. A class is used as a blueprint for creating objects.
For example, you could declare a Customer class and use it to create many Customer objects. In this case, the Customer class is a blueprint for creating a single customer. Not all customers are equal, but they can all be described with the same fields, such as age, gender, membership type, and so on.
The goal of OOP is to implement real-world entities into code. You can model almost anything in your life with OOP. For example, you interact with people every day. Even though people are different, they are still just people. In OOP terms, you could model people with a single class and create as many instances with different properties.
But that’s too complex of an example for today. Instead, we’ll explore OOP concepts with cars. Let’s see how classes and objects work in practice next.
Classes and objects
Think of classes as your own data types. There are built-in data types in Python, such as lists and strings, but those aren’t enough for more advanced use cases.
In Python, a class is defined by putting a keyword class followed by a class name and a colon. The class name is arbitrary, but it’s a good practice to write it in a title case. For example, write MyPythonClassinstead of myPythonClass or my_python_class.
Once you have the class declared, you can make as many instances as needed. Let’s take a look at an example:
class Car:
    pass

car = Car()
print(car)
In the above example, we’ve created an empty Car class. Just below, we’ve made an instance of it (stored in the variable car) and printed the results. By default, only the memory address is printed to the console: <__main__.Car object at 0x7fda5cefb3d0>.
This empty class is pretty much useless, so let’s start adding things to it. We’ll start with a constructor.
Constructor
A class constructor has only one goal: assigning values to the class variables when an object is created.
We are working with cars here, so it would be a good idea to take a moment and think about what every car has in common. For our example, three properties are enough — car brand, color, and license plate.
The properties of a car must be inside the __init__() method. This method is also called an initializer or a constructor – so keep in mind that these are synonyms. The __init__() method is called immediately whenever an object is created.
The first parameter of the constructor must be self. It is a keyword that has a job of assigning the passed values to class variables. In other programming languages such as Java, it’s named this.
Let’s now see how to add a constructor with the three mentioned properties and how to make an instance:
class Car:
    def __init__(self, brand, color, plate):
        self.brand = brand
        self.color = color
        self.plate = plate

car = Car(brand='Audi', color='Black', plate='XYXY-123')
print(car)
That’s the general syntax you want to remember. Upon making an instance, you can see that three arguments are required now, and not providing them would result in an error. The print statement still outputs a memory address, but that’s expected.
Our Car class is still pretty dull. Luckily, we have methods to spice things up. Let’s explore them next.
Class methods
In the most simple terms, methods are functions used to describe the behavior of objects. Covering everything you can do with methods would take an entire article, at least, so let’s stick with the 80:20 principle.
This section covers regular, static, private, and special methods. The term private is open for debate in Python, as there’s no corresponding keyword, as is the case with Java.
You can declare regular methods just as you would any other functions, with a def keyword followed by the method name and the argument list. The regular method must contain self as the first argument.
On the other hand, a static method doesn’t. It is exactly the same as regular methods, but we need to put a @staticmethod decorator above the declaration.
Private methods are very similar to regular ones. The convention is to use an underscore before the method name. This doesn’t make the method private, as you can still access it from the outside. The underscore is a way of telling other developers they shouldn’t use this method explicitly and shouldn’t modify its functionality.
Last but not least, we have special methods. These modify the original behavior of the class. For example, instead of outputting the memory address every time the instance is printed, we can modify the output with the __str__ method (note the double underscore). When dealing with an array of objects, the print behavior is modified with the __repr__ method. There are many more, but these two will get you started.
Here’s the code snippet demonstrating every type of method and how to call it:
class Car:
    def __init__(self, brand, color, plate):
        self.brand = brand
        self.color = color
        self.plate = plate

    def start(self):
        return f'{self.color} {self.brand} started!'

    @staticmethod
    def stop():
        return 'All systems stop!'

    def _check(self):
        return 'Private method'

    def __str__(self):
        return f'Brand: {self.brand}, Color: {self.color}, Plate: {self.plate}'

    __repr__ = __str__


cars = [Car(brand='Audi', color='Black', plate='XYXY-123'),
        Car(brand='BMW', color='Purple', plate='QWER-321')]

print(cars[0])
print(cars[0].start())
print(cars[0].stop())
print(cars[0]._check())
print(cars)
And here is the corresponding output:

Image 1 — Exploration of Car class methods (image by author)
Up next, let’s discuss inheritance.
Inheritance
Inheritance is an essential pillar of OOP. Because of it, one class can inherit attributes and methods of another. The class whose properties and methods are inherited is called the Parent class. Similarly, the class which is inheriting is called the Child class.
In a car analogy, you can think of it like this: every Audi is a car, but not all cars are Audi. Audi is a child class, inheriting basic properties and methods from the car class.
To make inheritance work, you’ll have to put the name of a class you are inheriting from in the parenthesis after the child’s class name. Let’s take a look at an example:
class Audi(Car):
    def __init__(self, year, line, is_sline):
        self.year = year
        self.line = line
        self.is_sline = is_sline

    def describe(self):
        return f'Describe method of the Audi class'

    def __str__(self):
        if self.is_sline:
            return f'S Line Audi {self.line} from {self.year}'
        else:
            return f'Audi {self.line} from {self.year}'


a3 = Audi(year=2012, line='A3', is_sline=False)
a4 = Audi(year=2015, line='A4', is_sline=True)

print(a3)
print(a4)
print(a3.describe())
print(a4.stop())
Here’s the output:
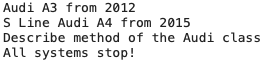
Image 2 — Inheritance in action (image by author)
The describe method is new and specific to the Audi class. We’ve overridden the __str__ method, as you can see from the first two print statements. We can use the stop method from the Car class inside the Audi class because of inheritance.
Building classes like this is limited. We still need something else. For example, in the Audi class, we can’t access the start method because it requires the fields that the Audi class doesn’t have. The super() keyword comes to the rescue.
Calling super() in the constructor calls the constructor of the parent class and gives us access to everything inside. Let’s take a look at an example:
class BMW(Car):
    def __init__(self, year, color, plate):
        super().__init__(brand='BMW', color=color, plate=plate)
        self.year = year


bmw = BMW(year=2018, color='Red', plate='ABCD-123')

print(bmw)
print(bmw.start())
print(bmw.stop())
Here’s the output:

Image 3 -Inheritance and super keyword (image by author)
As you can see, the BMW class doesn’t have any methods but can access anything from its parent.
Parting words
And there you have it — the basics of object orientated programming with Python. This was a relatively short guide on essential OOP concepts packed with examples. I hope you’ve managed to follow along and that the concepts are much clear now.
Everything you’ve learned today is more than enough to get you started. OOP paradigm can be used in all types of projects. I like to do machine learning in this way and extend the functionality of built-in predictive algorithms.
Thanks for reading.