Install PySpark locally and load your first dataset - Only 5 minutes required.
In the world of big data, knowing how to efficiently handle huge datasets is a must. That’s where Apache Spark chimes in. It’s a data processing framework used to perform data processing tasks on huge datasets. Spark also allows you to distribute data processing tasks across multiple computers.
Spark is written in Scala, but you don’t need to know Scala to work with Spark. It comes with a Python API called PySpark, and that’s what we’ll use today. The API isn’t very Pythonic because they use the camel case naming convention. It is a bit of an eye-sore for Python users, but that’s just something you have to get used to.
My goal is to write an entire Spark series covering important topics, such as Spark in Python, Spark SQL, Machine Learning with Spark, Streaming, and Spark in Cloud on different providers, such as Amazon EMR and DataBricks.
To get started with PySpark, we’ll first need to create a new Python virtual environment and install the libraries. Let’s do that next.
Don’t feel like reading? Watch my video instead:
Virtual Environment Setup for Apache Spark (PySpark)
Let’s start by opening a new Terminal window and creating a new Python virtual environment. I’m using Anaconda to manage environments. The procedure will be a bit different if you’re using pyenv or something similar:
conda create --name spark_env python=3.9 -y
conda activate spark_env
From here we can install the libraries. I always like to have Numpy and Pandas installed, but they aren’t required for today. We’ll use JupyterLab as an IDE, so we’ll install it as well.
Once these are installed, we can install PySpark with Pip:
conda install -c conda-forge numpy pandas jupyter jupyterlab
pip install pyspark
Everything is installed, so let’s launch Jupyter:
jupyter lab
The last step is to download a dataset. Spark is typically used for huge datasets, but for simplicity, at this point, we’ll use a small one. I opted for the Boston housing prices dataset, so download it and place it somewhere, preferably in the same folder where your notebooks will be.
And that’s all we need to get started working with PySpark. Let’s explore the basics next.
How to Start a Spark Session with Python
Okay, by now you should have the dataset downloaded and Jupyter running. Open a blank Jupyter Notebook - there’s one important thing you’ll always want to do before starting to work with Spark.
It has to do with visuals. Spark Data Frames won’t be printed as Pandas Data Frames. They’re likely to overflow to a new line if you have too many columns, which is just terrible to look at. Write the following code in all Notebooks that use Spark to mitigate the issue:
from IPython.core.display import HTML
display(HTML("<style>pre { white-space: pre !important; }</style>"))
From here we can start the Spark session. You can consider this session to be an entry point to Spark SQL. It’s what you’ll always create first when working on Spark SQL applications and data pipelines.
from pyspark.sql import SparkSession

spark = SparkSession.builder.appName("spark-session").getOrCreate()
The session information is now stored in the spark variable, so let’s see what it contains:
spark
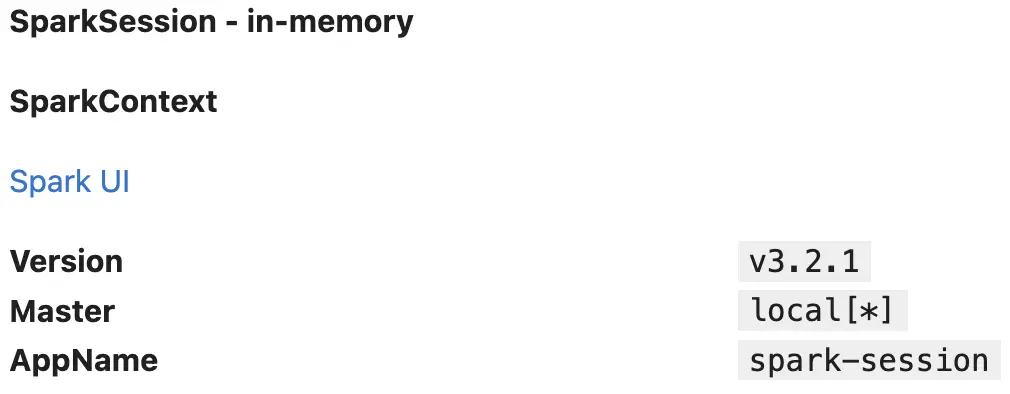
Image 1 - Contents of the spark variable (image by author)
Nothing particularly interesting here because we’re running Spark locally. You can see a link to Spark UI, so let’s click on it:
Image 2 - Spark UI (image by author)
It’s pretty much empty because we haven’t run any code yet, but you’ll see a lot of output if you were to open Spark UI at the end of the article.
Let’s go back to the notebook and start working with data. There are a couple of things you should know when reading datasets, so let’s go over them next.
How to Read Datasets with Spark and Python
There’s no one stopping from using the read CSV method, similarly to what you’d do in Pandas:
df = spark.read.csv("../BostonHousing.csv")
df

Image 3 - Contents of the df variable (image by author)
But as you can see, it has a couple of issues. First, the column names are automatically generated, and we don’t want that because the CSV file has a header row. And second, all columns were converted to strings, and the actual dataset contains numerical data only.
Let’s take a look at a couple of PySpark methods to verify these claims. The first one is called .show() and it will display our dataset in the notebook. By default, it shows only 20 rows:
df.show()
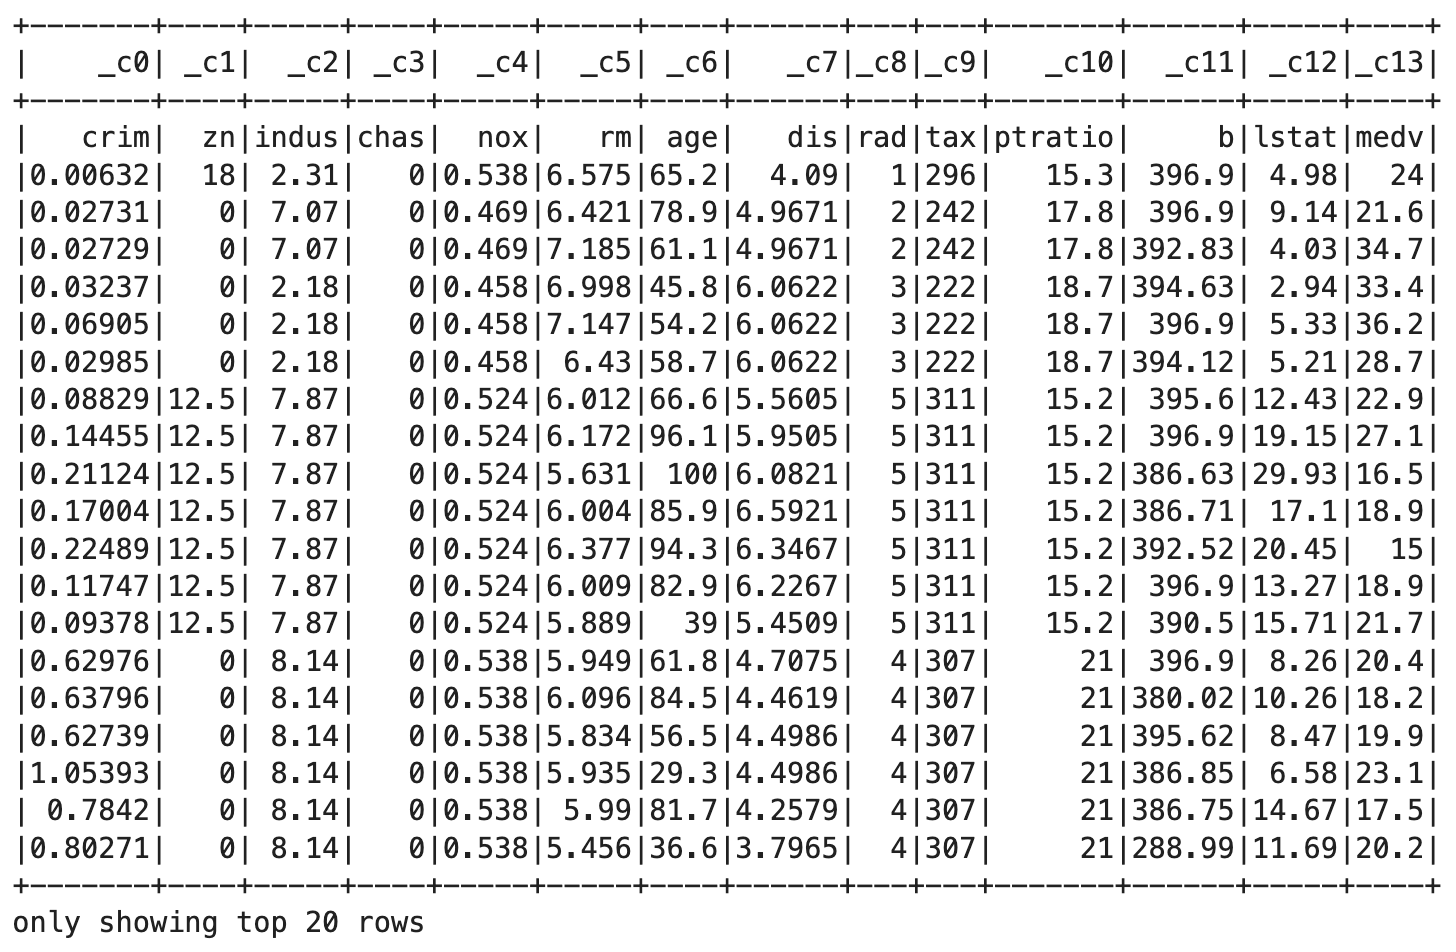
Image 4 - First 20 rows of the Boston housing dataset (image by author)
The first issue is visible here. The column names were generated by PySpark, so the actual CSV header row is considered as a value. For that reason, all columns are strings instead of floating points and integers.
The .printSchema() method will provide concrete proof to that claim:
df.printSchema()
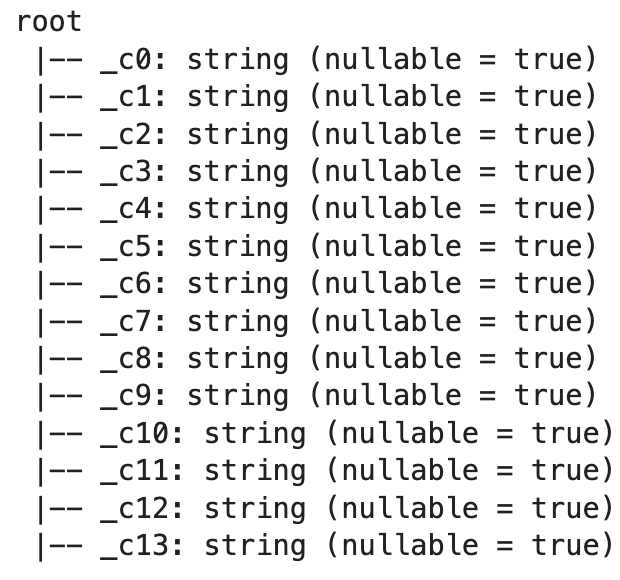
Image 5 - Default dataset schema (image by author)
You can see that everything is a string, which is not what we want. There’s an easy fix, and it is providing two additional parameters when reading datasets:
df = spark.read.csv("../BostonHousing.csv", header=True, inferSchema=True)
df

Image 6 - Dataset after the correct reading (image by author)
From the output, we can see that the data type for all columns is either int or double. Double isn’t an actual data type in Python. It comes from Scala, but Python won’t have any issues with it.
We can print the schema once again to verify we have the correct data types now:
df.printSchema()
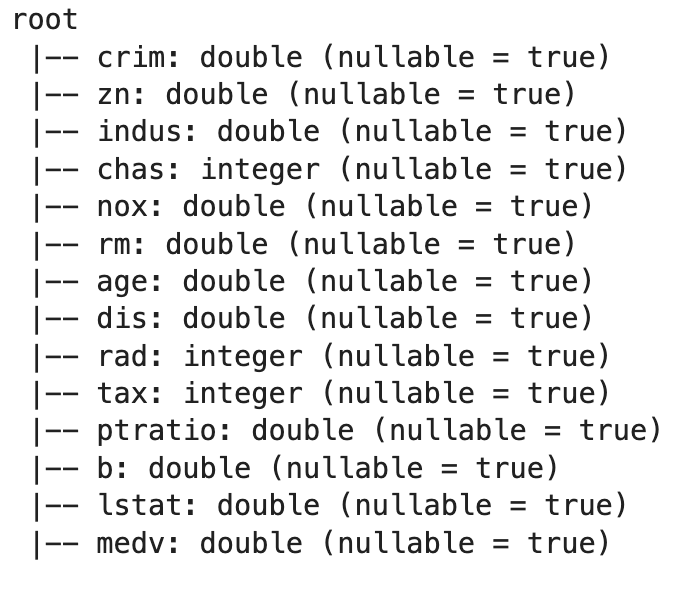
Image 7 - Dataset schema after correct reading (image by author)
Everything looks alright, which means we can stop here for today. I don’t want to go over the specifics of working with columns and data aggregations. We’ll do that in the following article.
Summary of Apache Spark for Data Science
Today we’ve laid out the foundation for the upcoming articles in the Apache Spark series. You’ve successfully installed PySpark and seen how to load the datasets. The next step is to learn how to work with them, and that’s what the upcoming articles will cover.
The following article will show you how to manipulate and process data in Pandas-like syntax, and the one after that will show you how to do the same operations with SQL-like commands. Both are perfectly acceptable with Spark, and which one you’ll choose boils down to personal preference. If you write a lot of SQL daily, then why not leverage the option of Spark SQL.
Stay tuned for the upcoming articles, and I’ll make sure to release them in a couple of days.
Recommended reads
- 5 Best Books to Learn Data Science Prerequisites (Math, Stats, and Programming)
- Top 5 Books to Learn Data Science in 2022
- 7 Ways to Print a List in Python
Stay connected
- Hire me as a technical writer
- Subscribe on YouTube
- Connect on LinkedIn